AWS Cloud Deployment Automation with Jenkins CI

Kunal is a DevOps and Cloud Native Advocate with a passion for Open Source. He's been involved in the DevOps and open-source ecosystem for 1.5+ years and has a strong experience in public speaking, community management, content creation etc. He has experience working on and contributing to some of the major projects in the CNCF, including Kubernetes, Layer5 and others. He always strives to empower others with my experiences and believes in growing with the community!
When we take a peak into the overall DevOps ecosystem, we often talk a lot about "automation". DevOps and automation are closely related because DevOps practices often rely heavily on automation to streamline the software development lifecycle, reduce errors, and increase efficiency.
To understand this better, we can think of the following real-world scenario:
In a traditional software development process, a developer manually builds and tests the code on a local machine, and then deploys it to a testing environment for further testing.
This process is time-consuming and prone to a lot of errors as well.
However, by automating these tasks, developers can build, test, and deploy their code automatically. Thus, saving time and reducing errors.
Sometimes you would have wondered how this automation works in a real-world application and eventually, how can we use these practices to build something?
In this tutorial, we'll be understanding exactly that by building a simple end-to-end deployment automation using AWS Cloud and Jenkins CI.
By the end of this project, you will have a clear understanding of how automation works in a real-world application and have some familiarity working with technologies like AWS, Docker, Jenkins and more.
I hope you are excited, so let's get started!
Architecture
Before we dive into the tutorial section, it's important to understand how the project is laid out i.e. the architecture and the overall workflow.
Here is a diagram of the project we'll be building:

Let's walk through the whole workflow together!
In this scenario, we have a Node Js application which is hosted on GitHub. Using Jenkins, we will then be creating an "automation" or what is technically referred to as a CI/CD pipeline, which will first containerise our application using Docker and then deploy that on an AWS EC2 i.e. a cloud server. Additionally, the newly created docker image will be pushed to Docker Hub, for further use.
The interesting part is, the CI/CD pipeline or the automation will be triggered by any code changes in the GitHub repository and our application would automatically be deployed (with the changes made) on our cloud server.
Sounds interesting, right? I hope this gave you a gist of what we'll be building together and let's move on to the prerequisites section.
Prerequisites
Before you begin this tutorial, you'll need the following to get started:
Basic knowledge of AWS Cloud
- Specifically, the EC2 service
An AWS Free Tier account
Basic knowledge of containers and Docker
Familiarity with Jenkins CI
Basic knowledge of working with Linux and the essential commands
📍 Note
Prior knowledge of these tools would help you in building the project, but even if you aren't familiar with many of them, you'll surely be able to learn, build and follow along because a lot of basics of each tool will be covered.
Step 1: Create an IAM User
IAM stands for Identity and Access Management which helps you to control and manage the access to AWS resources in the form of permissions given to a user.
💡 Tip
It's always a good practice to work with IAM users, even if you are building personal projects.
To learn more about the concept of AWS IAM, refer to the documentation.
Create a new IAM user associated with your root account, with the following policy:
AmazonEC2FullAccess
This will provide you with full access to use Amazon EC2 via the AWS Management Console.
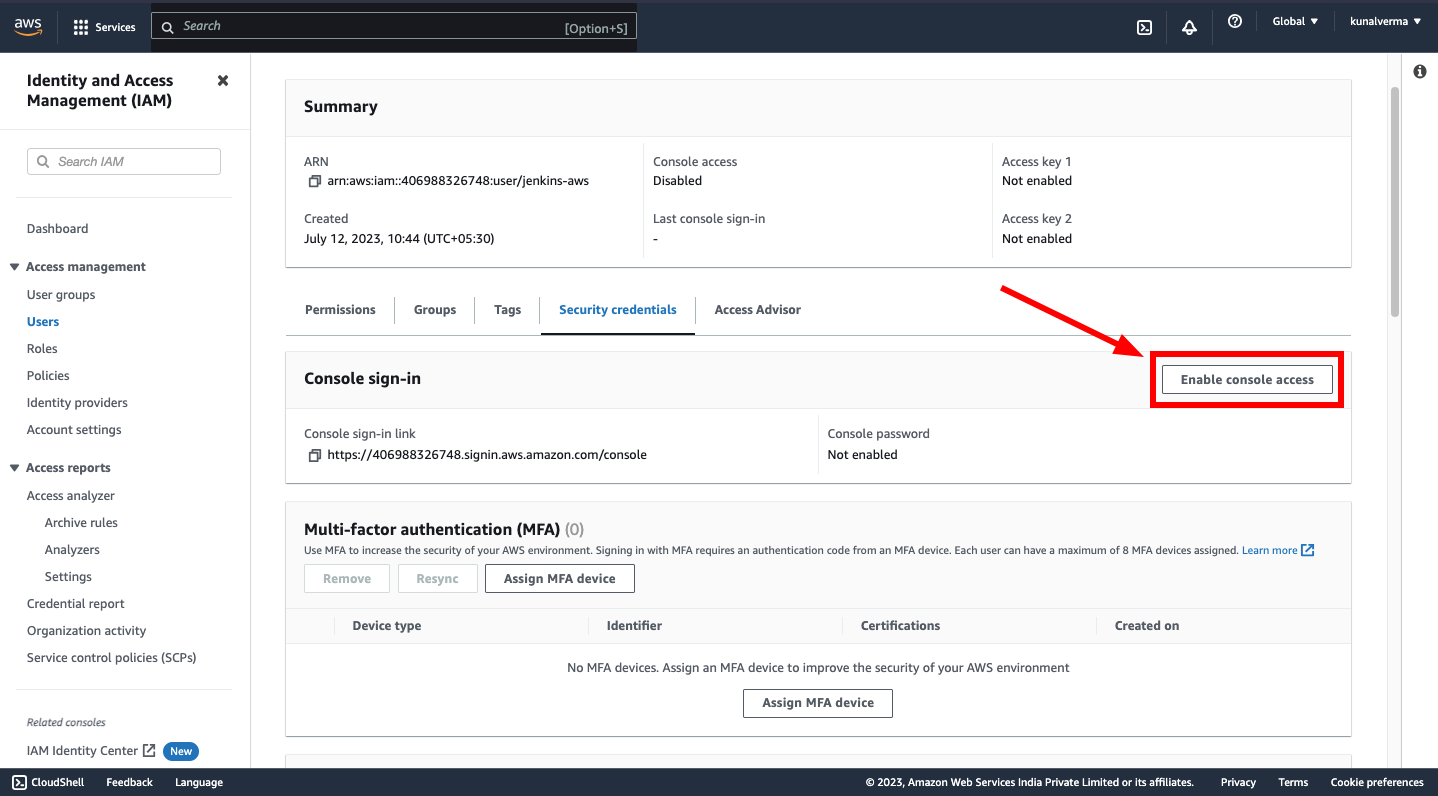
To access the IAM user's Management Console, you'll need to enable this option under the "security credentials" of your user, to get the login credentials:
Congratulations on setting up your IAM user 🎉
Now, let's proceed to create an AWS EC2 instance!
Step 2: Setup Amazon EC2 and Remote Access through SSH
If this is your first time working with AWS EC2, it's one of many AWS services that provides you with the ability to create and launch virtual servers on the cloud, without the need to invest in any hardware up-front.
A very simple real-life example of this can be that, you can run the Linux Operating System having the maximum specifications possible on a fairly old Windows machine. Isn't that amazing?! 😮
Create a new EC2 instance using the AWS Management Console, giving it the following configuration:
Choose any name. For example:
jenkins-aws.For the AMI/operating system, choose
Ubuntu.Choose
t2.microas the Instance type.Create a new key pair either of type
RSAorED25519and download the.pemfile.
Except for the above configuration, please leave everything to default settings and create a new instance.
Once the instance is running, you can connect to it remotely using SSH as shown below:
chmod 400 jenkins-aws.pem
ssh -i jenkins-aws.pem ubuntu@PUBLIC_IP_ADDRESS

Congratulations on logging in to your cloud server 🎉
💡 Tip
After successfully connecting to the Ubuntu instance, make sure to run the following command to update the necessary OS packages:
sudo apt update
Let's proceed to the next step where we'll test the Node Js application on the Ubuntu server!
Step 3: Testing our Node Js App
Connect to your Ubuntu EC2 instance and clone the GitHub repository using the following command:
git clone https://github.com/verma-kunal/Cloud-Deployment-Automation.gitMake sure you have
Node Jsandnpminstalled. If not, you may follow this guide by Digital Ocean to properly install both using theaptpackage manager.Once done, you can verify the installation using the following command:
node -vNavigate to the source code directory:
cd Cloud-Deployment-AutomationFollow the instructions given in the README to configure the initial application setup.
Install the
node_modulesand run the application using the following commands:npm install npm run startYou'll be able to access the application on the browser at
PUBLIC_IP_ADDRESS:3000📍 Note
To access the app at port
3000, you'll need to allow incoming traffic to that port, by adding it to your server's "inbound rules".Inbound rules control the incoming traffic that's allowed to reach the instance.
In the AWS Management Console, head over to -
Security Groups > Your instance's security group ID > Edit inbound rules, and add the following rule to allow traffic from port3000.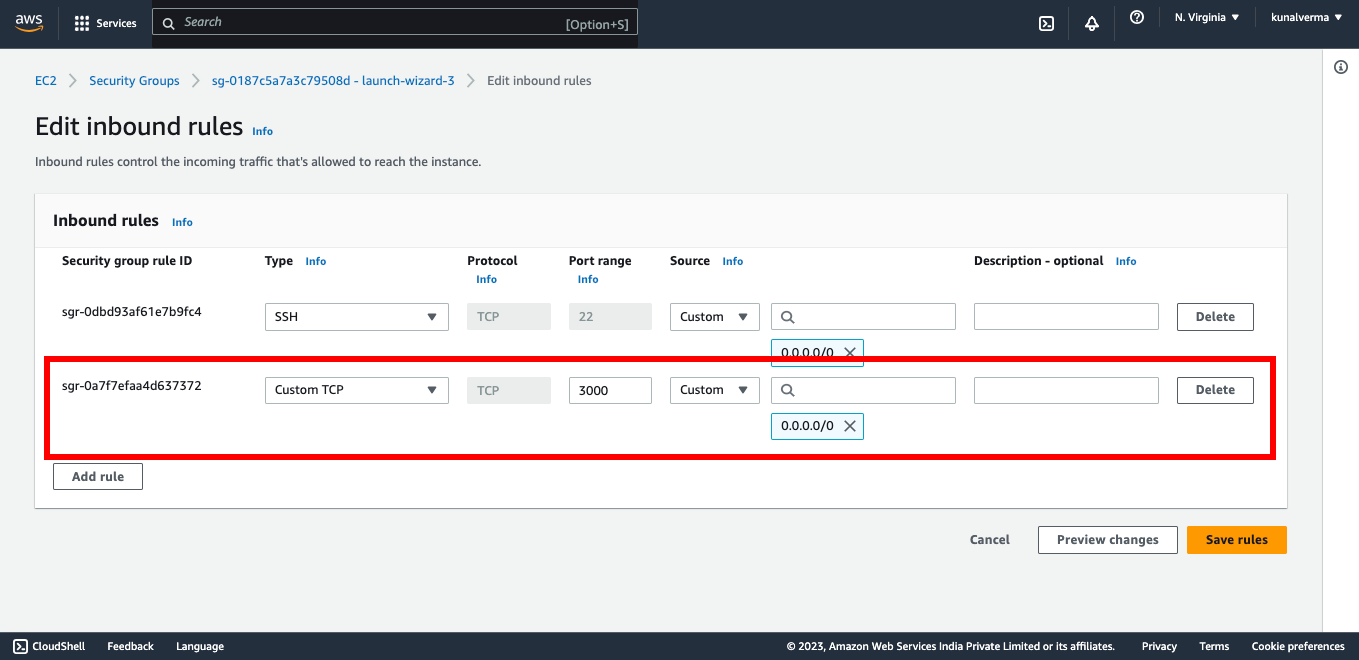
Congratulations on successfully running the application on the EC2 instance 🎉
P.S.: Shoutout to Kubesimplify Workshops!
Additionally, here is an in-depth video tutorial on the entire process we discussed above. Feel free to refer to that, if you get stuck somewhere!
Let's proceed to set up Docker on our EC2 instance.
Step 4: Docker Installation on AWS EC2
As we'll proceed to build the CI/CD pipeline, we'll need Docker to test and interact with our containerised application.
To keep this section short and precise, you can follow the detailed guide by Digital Ocean to properly configure Docker on your Ubuntu instance.
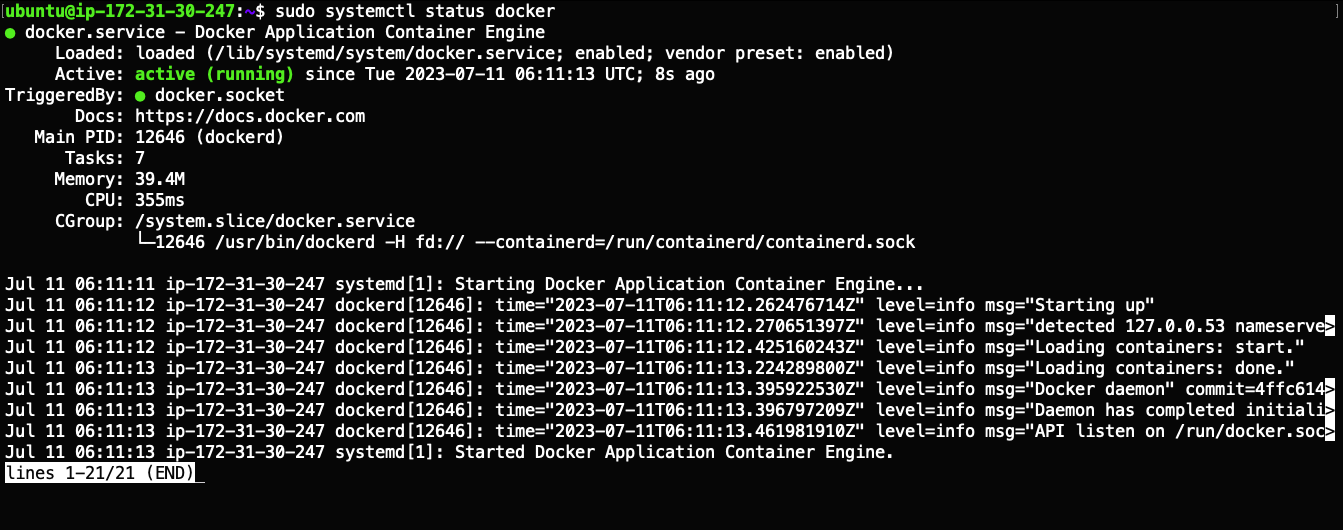
Once Docker is installed, you can run the following command to verify the installation:
sudo systemctl status docker
Here's a snapshot of the desired output:
Congratulations on successfully installing Docker 🎉
Let's proceed to install and set up Jenkins on our EC2 instance!
Step 5: Install and Configure Jenkins on AWS EC2
Disclaimer: From this section, we are moving towards the most important aspects of this tutorial!
If this is your first time using Jenkins, it's an open-source automation server used for automating repetitive tasks such as building, testing and deploying, which are only a handful of some basic tasks involved in a CI/CD pipeline (Continuous Integration and Continuous Delivery).
To know more about Jenkins and CI/CD in general, refer to this blog post on Kubesimplify.
Below are the steps to install Jenkins on your EC2 instance:
Oracle JDK 11 is the prerequisite to running the Jenkins server. Run the following commands to install JRE and Java JDK:
 sudo apt install default-jre
 sudo apt install default-jdk
You may verify the Java installation using the following commands:
java -versionOnce JDK 11 is installed, run the following set of commands to install the Jenkins server:
 curl -fsSL https://pkg.jenkins.io/debian-stable/jenkins.io-2023.key | sudo tee \
   /usr/share/keyrings/jenkins-keyring.asc > /dev/null
 echo deb [signed-by=/usr/share/keyrings/jenkins-keyring.asc] \
   https://pkg.jenkins.io/debian-stable binary/ | sudo tee \
   /etc/apt/sources.list.d/jenkins.list > /dev/null
 sudo apt-get update
 sudo apt-get install jenkins
To start the Jenkins server, enable the Jenkins service with the command:
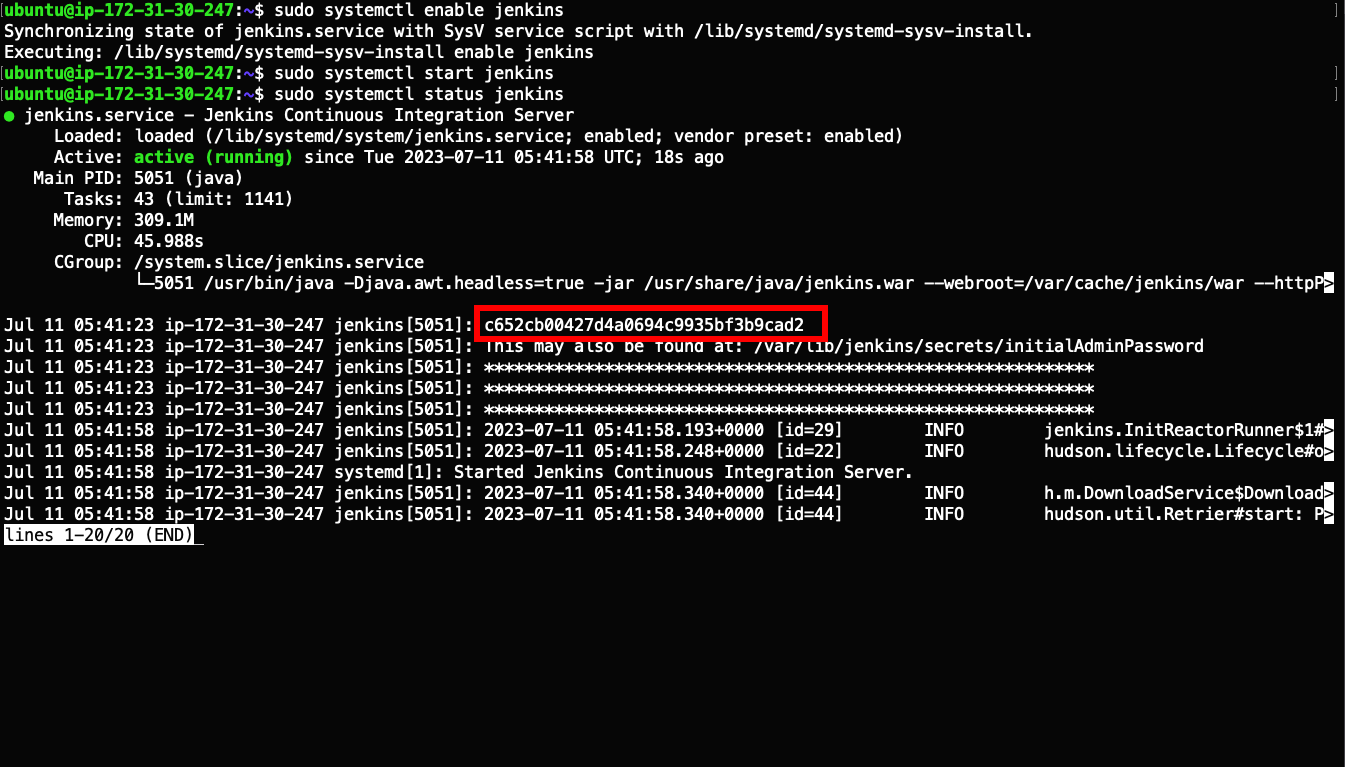
sudo systemctl enable jenkinsYou can now start the Jenkins service and check its status using the following commands:
 sudo systemctl start jenkins
 sudo systemctl status jenkins
If everything has been set up correctly, you should see an output like this:
For further setup, you can now access the Jenkins UI on its default port,
8080, using your instance IP address:http://your_server_ip:8080💡 Remember
To access the Jenkins UI, you'll have to allow traffic to port 8080. Refer
Step 3: Testing our Node Js Appsection for further details.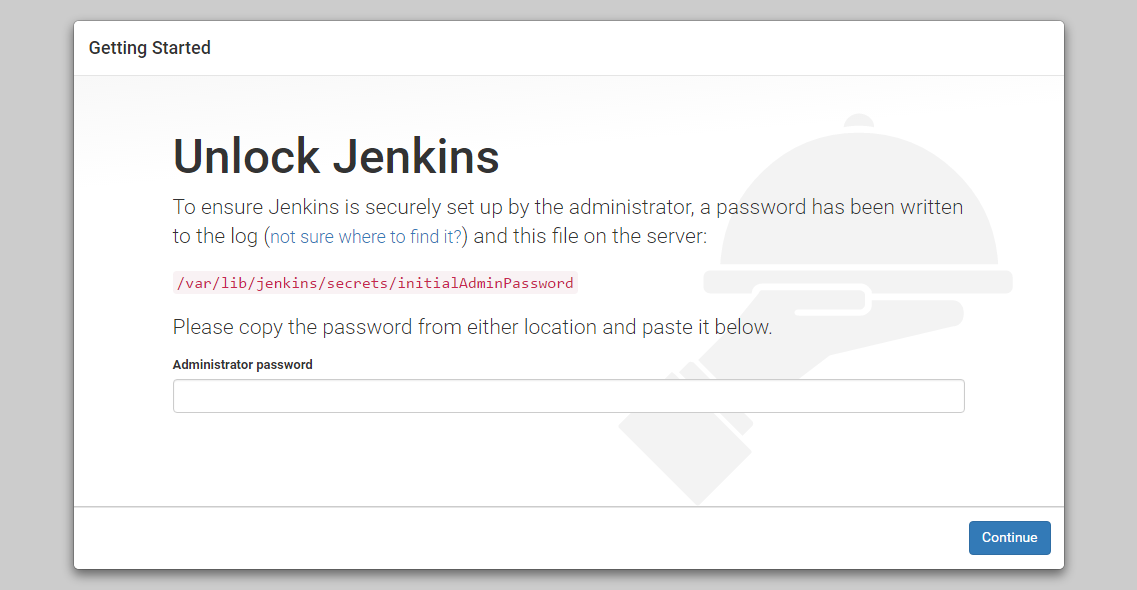
To get the initial password, use the
catcommand with the location mentioned in the UI above:sudo cat /var/lib/jenkins/secrets/initialAdminPasswordCopy the 32-character alphanumeric password from the terminal and paste it into the Administrator password field, then click Continue.
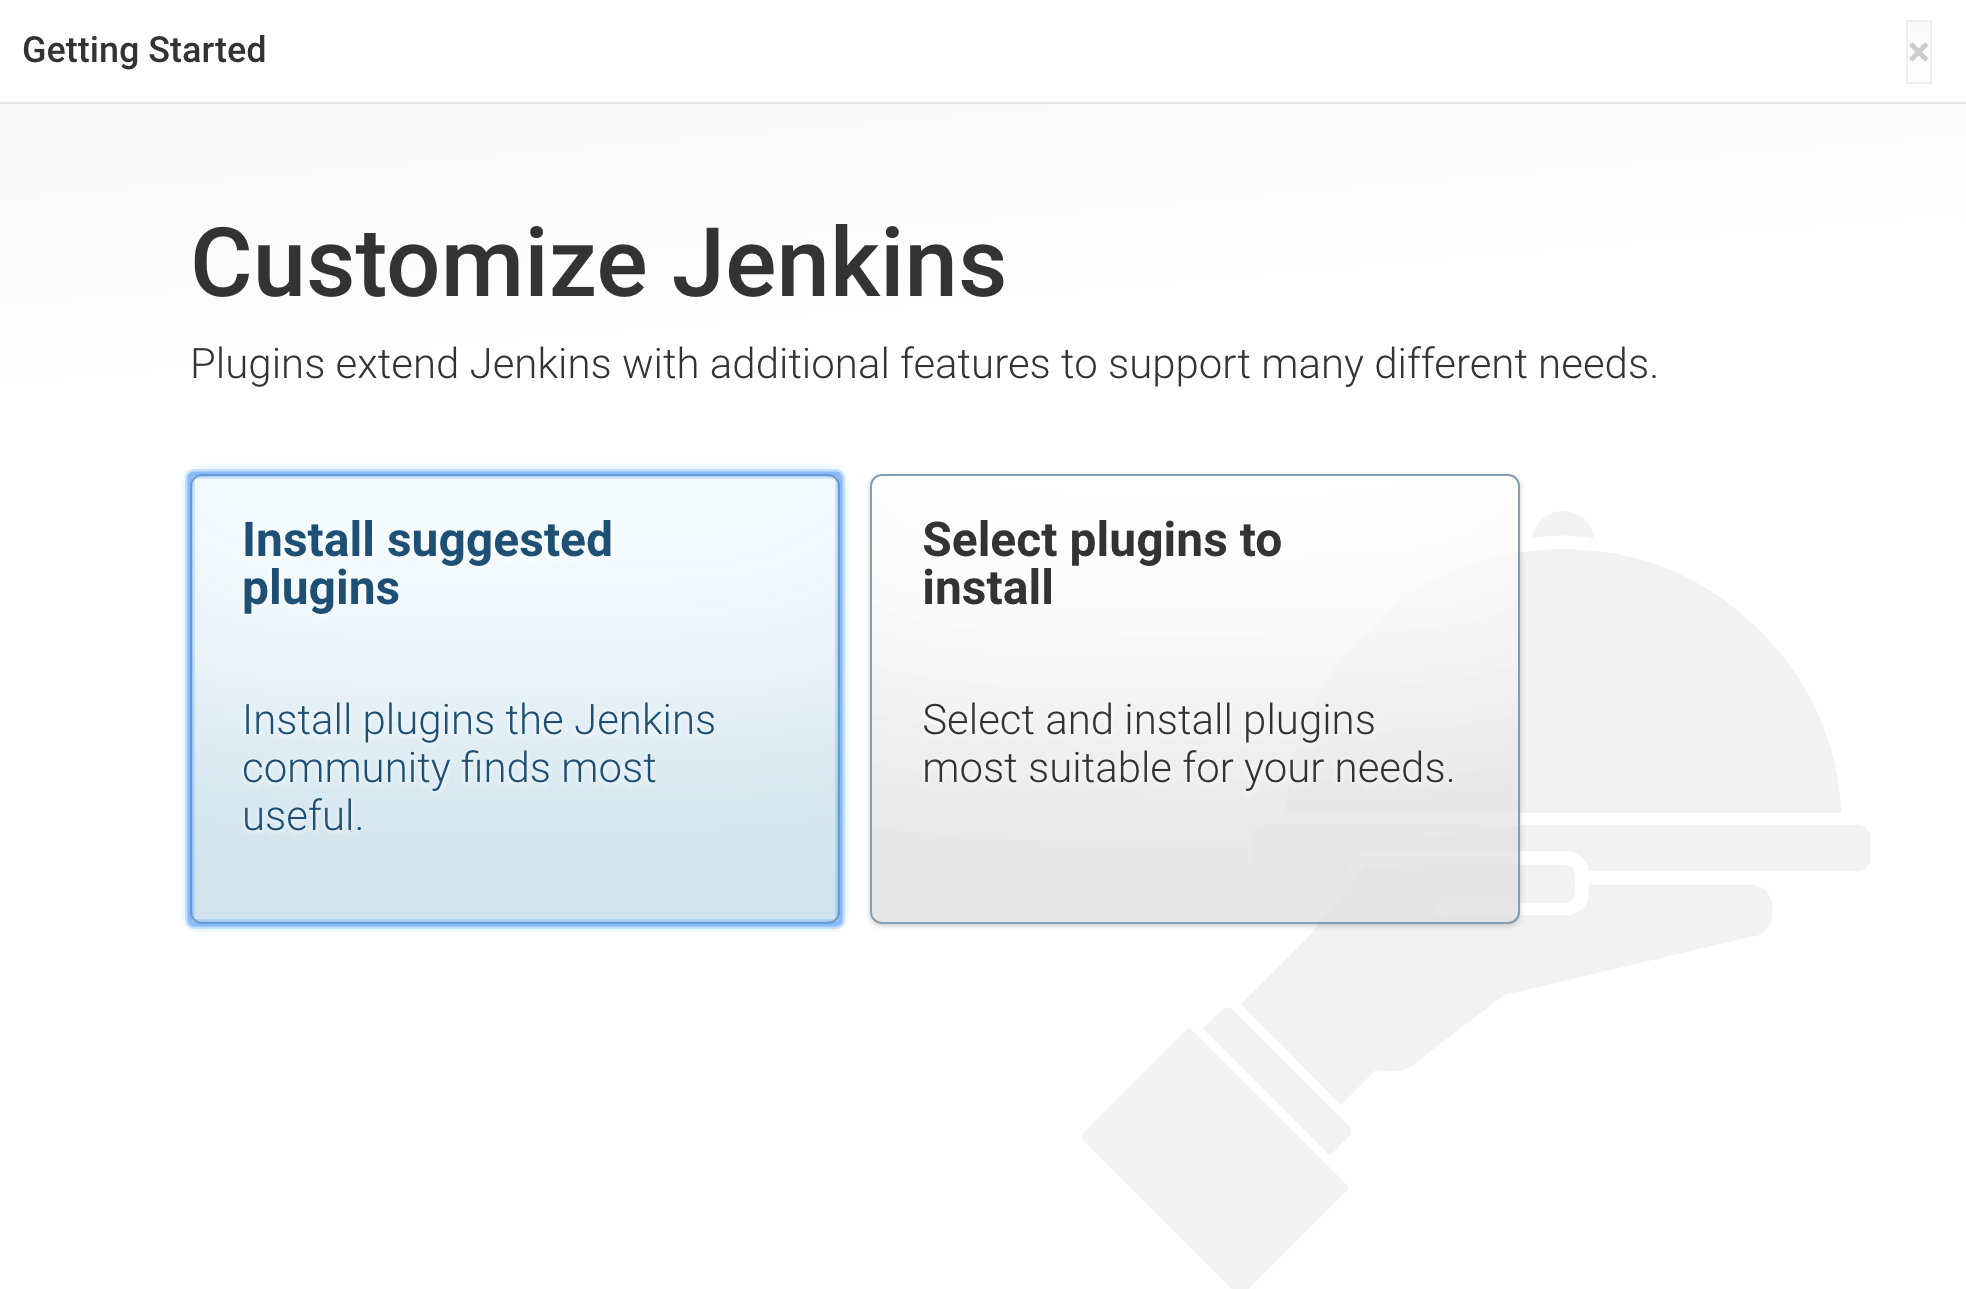
On the next screen, we'll select the "Install suggested plugins" option which will install all the necessary plugins needed for the initial setup.
When the plugin installation is complete, you’ll be prompted to set up the first administrative user. It’s possible to skip this step and continue as
adminusing the initial password from above, so we'll do that, for now, to keep things simple!You can now start using Jenkins through the main dashboard:

Congratulations on completing the Jenkins installation 🎉 Believe me when I say, it gets tricky sometimes!
Step 6: Grant sudo access to Jenkins User
To free ourselves from any permission constraints throughout the project, we'll add the Jenkins user to the sudo group, through the following process:
Open the
sudoersfile in edit mode usingvimor any other terminal editor of your choice:sudo vi /etc/sudoersAs this is a read-only file, we need sudo to make changes to it.
Add the following line to the file:
jenkins ALL=(ALL) NOPASSWD: ALLThis gives the
sudoaccess to the Jenkins user and in future, if we use any command usingsudoinside the Jenkins environment, it will not prompt us for any password.To exit the editor mode in
vimpressescand to save the changes in this read-only file, we'll use the following command::w !sudo tee > /dev/null %You'll be presented with a prompt. Press
Oand the file will be saved. It remains open invimfor more editing or reading and you can exit normally by typing:q!since the file is still open as read-only.
You may find the full explanation of this command in the article here.
📍 Note:
Granting direct
sudopermissions to the Jenkins user is not a good practice if we talk about a production use case.
As this is part of your learning, you can sometimes use certain "workarounds" to reduce the chances of getting errors!
We are all set to move ahead and set up some necessary credentials in Jenkins.
Step 7: GitHub and Docker Hub Authentication with Jenkins
GitHub Authentication
To access our Node Js app from GitHub, we need to provide the necessary credentials to Jenkins to authenticate with our GitHub account. We'll use a Personal Access Token to securely authenticate GitHub with Jenkins. Below are the steps to do so:
Create a new Personal Access Token using the guide. Following the best practices, I'd suggest creating a fine-grained personal access token which allows us to set repository-specific permissions.
Grant the necessary permissions to your token, as shown below: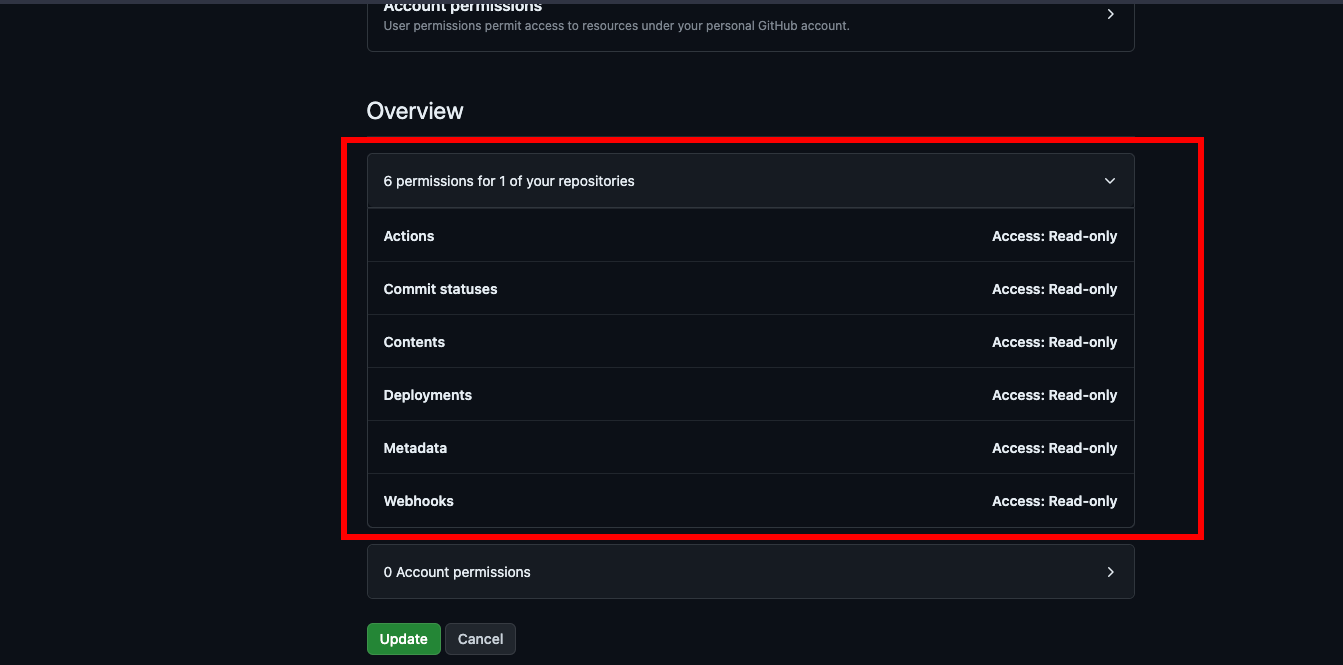
On your Jenkins Dashboard, head over to
Manage Jenkins > Credentials > System > Global Credentialsand click onAdd Credentials.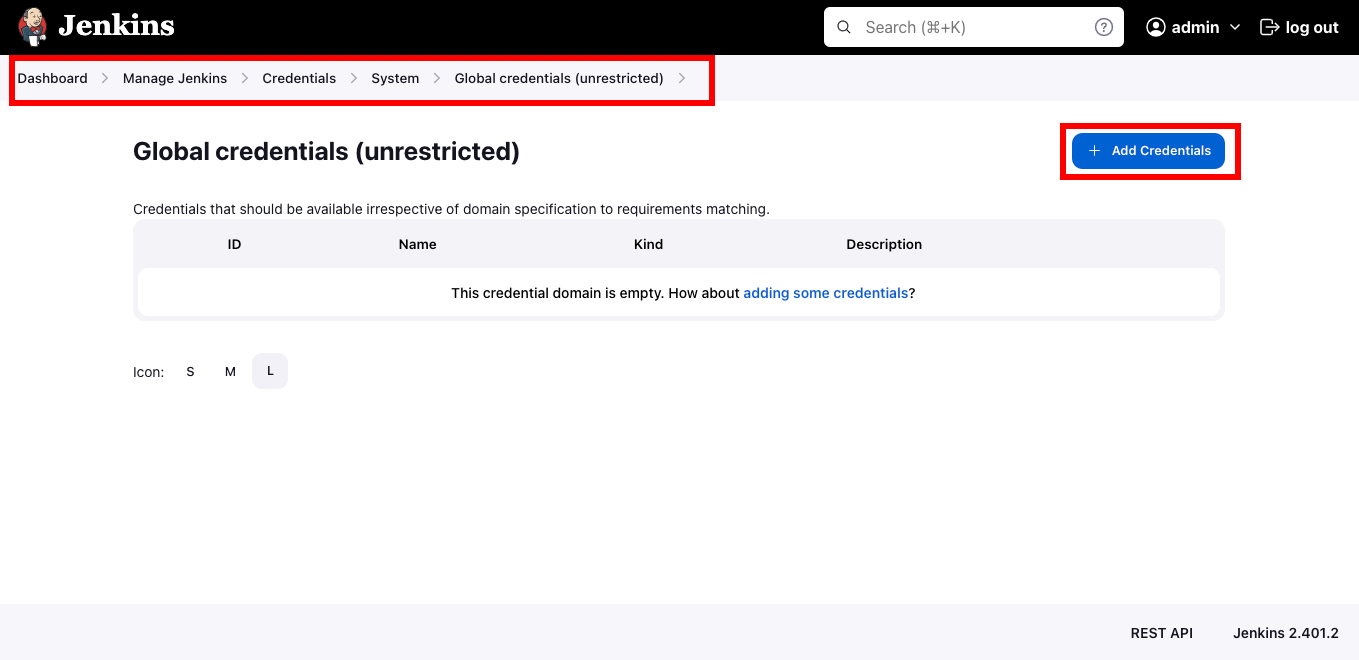
Fill in the necessary details for adding the GitHub credentials:
Username- Your GitHub usernamePassword- Personal Access Token (created above)ID- For uniquely identifying the credentials throughout the Jenkins environment. To keep it simple, typegithub.
Click save and we have successfully authenticated GitHub with Jenkins 🎉
Docker Hub Authentication
In our last stage of the CI/CD pipeline, the newly created docker image will be pushed to a container registry (in our case, Docker Hub) for any further use in future. For this, we need to authenticate Docker Hub with Jenkins.
Below are the steps to do so:
Head over to your Docker Hub account settings.
In the
securitysection, click on New Access Token, to generate a new token which we'll use to authenticate with Jenkins.Give the necessary permissions to your token as shown below and click
Generate.
Following similar steps as we did for authenticating GitHub, create new credentials in your Jenkins dashboard and fill in the necessary details for Docker Hub:
Username- Your Docker Hub username.Password- Access Token (created above).ID- Again, keeping it simply to bedockerhub.
Congratulations, you have successfully authenticated both GitHub and Docker Hub with Jenkins 🎉

Step 8: Setting up a Jenkins Pipeline
Let us now create a new Jenkins pipeline using the dashboard. Below is the step to do so:
Head over to the main dashboard and click on
Create a JobOn the following page, select the
Pipelineoption and give it a name of your choice.
In the pipeline configuration, head over to the Pipeline section and from the drop-down menu select
Pipeline script from SCM. This means that Jenkins will automatically detect aJenkinsfilefrom the source code management of your choice (which is GitHub in our case).Fill in the necessary details required in this section, which are as follows:
Repository URL- https://github.com/verma-kunal/Cloud-Deployment-AutomationCredentials- Select the GitHub credentials that were created in the above section.Branches Specifier-*/main
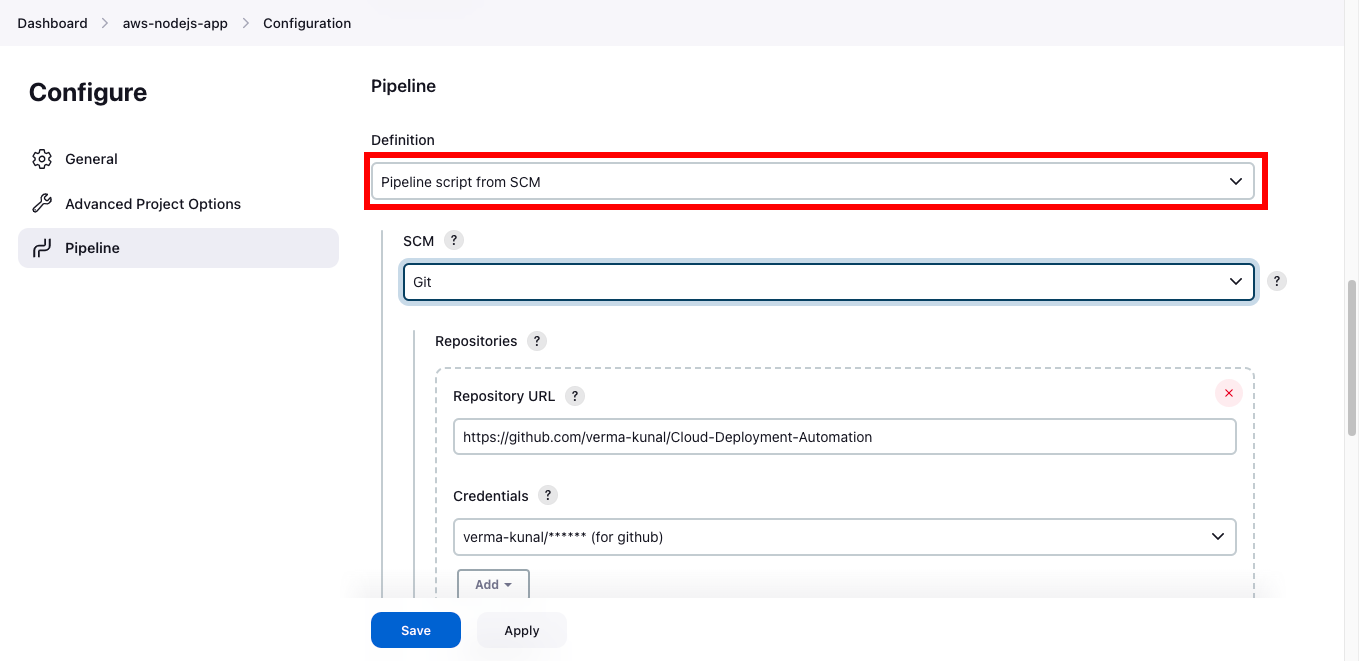
- Click
saveand we are done with the initial pipeline configuration!
Step 9: Analysis of Jenkinsfile
Below is the Jenkinsfile we are using to set up the entire CI/CD workflow:
pipeline {
    agent any

    options{
        buildDiscarder(logRotator(numToKeepStr: '5', daysToKeepStr: '5'))
        timestamps()
    }
    environment{

        registry = "vkunal/aws-app"
        registryCredential = 'dockerhub'
        commitHash = sh(returnStdout: true, script: 'git rev-parse --short HEAD').trim()

    }

    stages {

        stage('Build Docker Image') {
            steps {
                script{
                    sh "sudo docker build -t ${registry}:${commitHash} ."

                }
            }
        }
        stage('Run Docker Container') {
            steps {
                script{
                    sh "sudo docker run -dp 3000:3000 ${registry}:${commitHash}"

                }
            }
        }
        stage('Push to DockerHub') {
            steps {
                script{
                    docker.withRegistry( 'https://index.docker.io/v1/', registryCredential) {
                        sh "docker push ${registry}:${commitHash}"
                    }

                }
            }
        }
    }
}
Here is a breakdown of the different stages in our pipeline and some important keywords mentioned above:
Some of the additional options we have set for this pipeline: (optional)
buildDiscarder()- specifies the build discarder strategy for the pipeline build.numToKeepStr: '5': This parameter specifies the number of builds to keep. In this case, it is set to keep the latest 5 builds.daysToKeepStr: '5': This parameter specifies the number of days to keep builds. In this case, it is set to keep builds for 5 days.
timestamps()- adds timestamps to the console output of the Jenkins build.
There are three global variables defined:
registry- specifies a public docker hub repository (already created).registryCredential- Docker Hub credentials ID that we created before.commitHash- fetching the latest commit hash from Git.
stage('Build Docker Image')- In the very first stage, we are building a new docker image of our code from GitHub.stage('Run Docker Container')- In the second stage, the newly built docker image will run on port3000on our EC2 instance, which you'll be able to access locally on our browser through the URL:http://YOUR_IP_ADDRESS:3000/.stage('Push to DockerHub')- In the last stage, the newly created image will be pushed to the container registry i.e. Docker Hub.Here, we are using
docker.withRegistrymethod to authenticate this pipeline stage with Docker Hub, to perform thepushoperation.
This method takes in two arguments:Container registry endpoint URL - For Docker Hub, we have the end-point URL:
https://index.docker.io/v1/Docker Hub credentials ID which we have defined using the variable
registryCredential
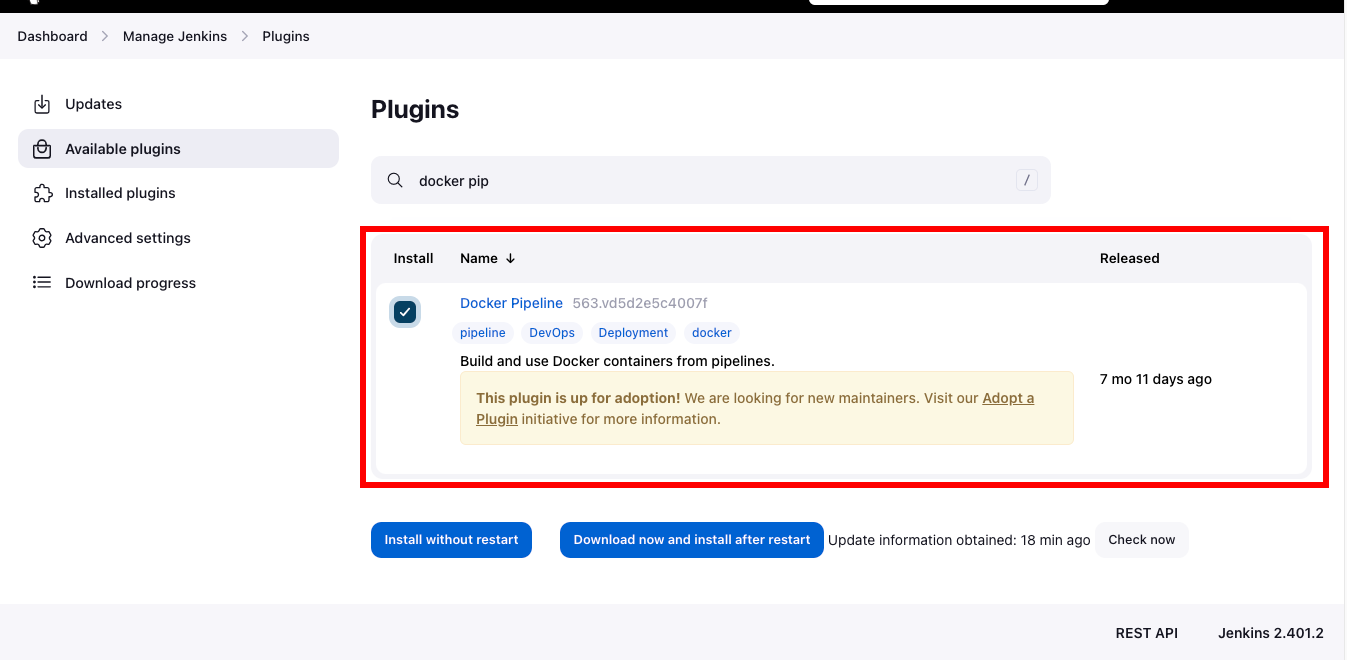
📍 Note:
Here
docker.withRegistryis one of the methods that come with the Docker Pipeline plugin in Jenkins.
To use this and similar methods in your pipeline, you need to install the plugin by heading over toManage Jenkins > Plugins.
Step 10: Jenkins Build Trigger using GitHub Webhook
This is an interesting part of the entire tutorial and the project!
To trigger a Jenkins build whenever Developers commit something into the repository, we will use a GitHub Webhook to configure this functionality.
Webhooks can be triggered whenever specific events occur on GitHub. For example, you can configure a webhook to trigger whenever:
Code is pushed to a repository.
A pull request is opened.
and more.
To know more about GitHub Webhooks, refer to the documentation.
Let us proceed to set up a webhook trigger for the use case:
In the pipeline configuration section on your Jenkins dashboard, scroll down to the Build Triggers section and select the option:
GitHub hook trigger for GITScm polling.
This enables Jenkins to be notified of any changes to our GitHub repository, through the webhook we'll create.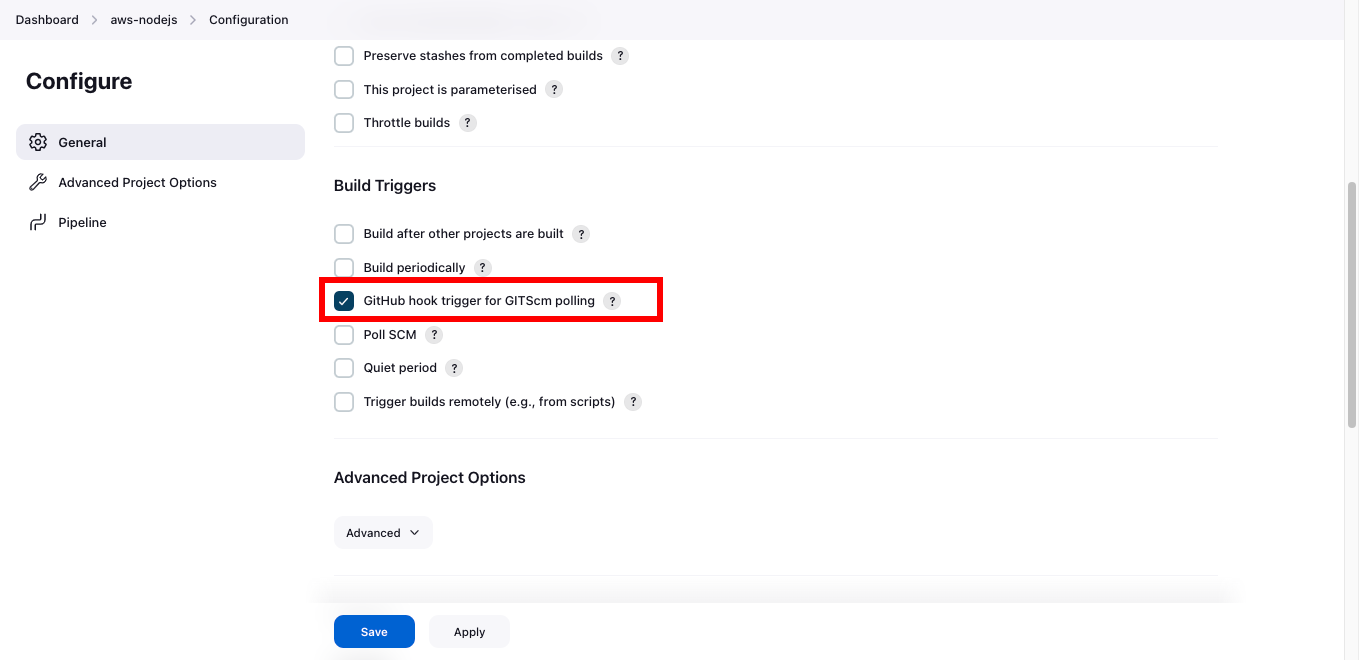
In your GitHub repo, head over to
Settings > Webhooksand Click onAdd Webhook.Below are the necessary details needed to create a webhook:
Payload URL - The payload URL is the URL of the server that will receive the webhook POST requests. In this case, the target server is the Jenkins server running at
http://YOUR_IP_ADDRESS:8080which we'll append with/github-webhook/.Content-Type -
application/json.Trigger - Just the push events.
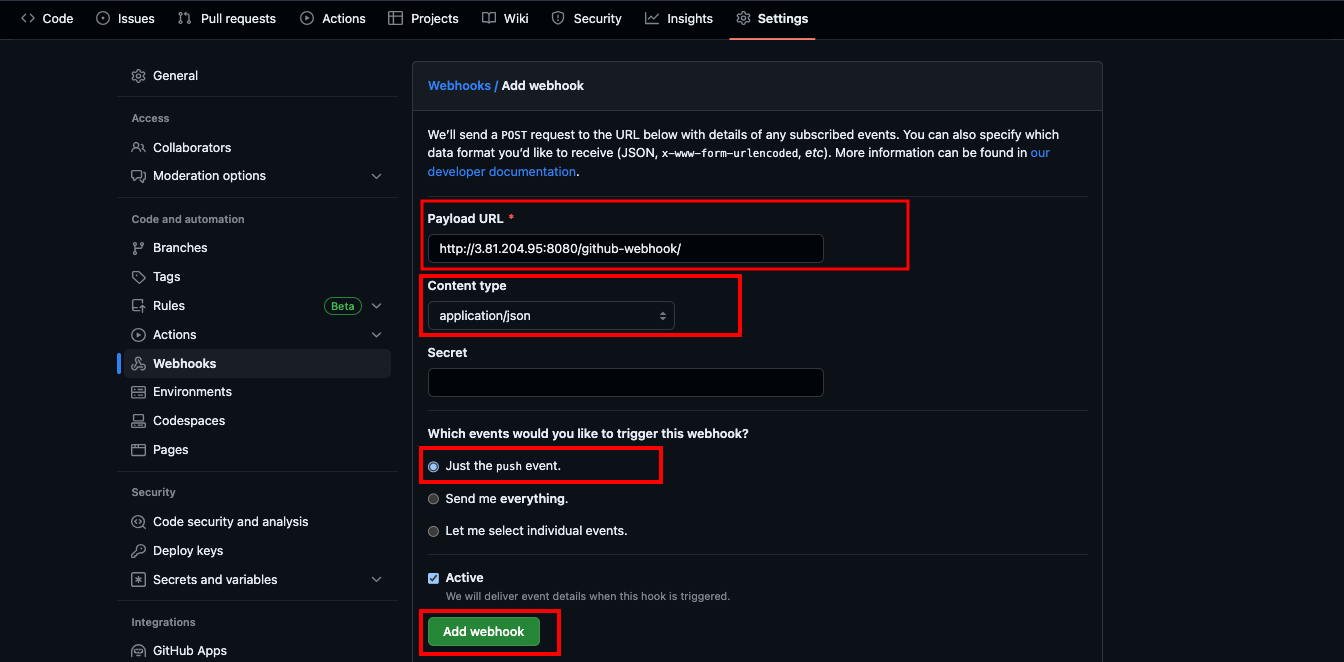
Congratulations! You have successfully configured a GitHub Webhook 🎉 that will listen for any commit pushes on the repository and trigger a new Jenkins build.
Step 11: Let's execute our Pipeline
Now, it's time to test the entire automation. Here is what you can do:
Head over to the GitHub repo and commit a small change in the app. I'd suggest making some changes to the front end so that it will be visible once deployed.
Head over to the Jenkins dashboard where a Jenkins build will automatically be triggered. You can see the pipeline stages defined in the Jenkinsfile being executed in sequential order.
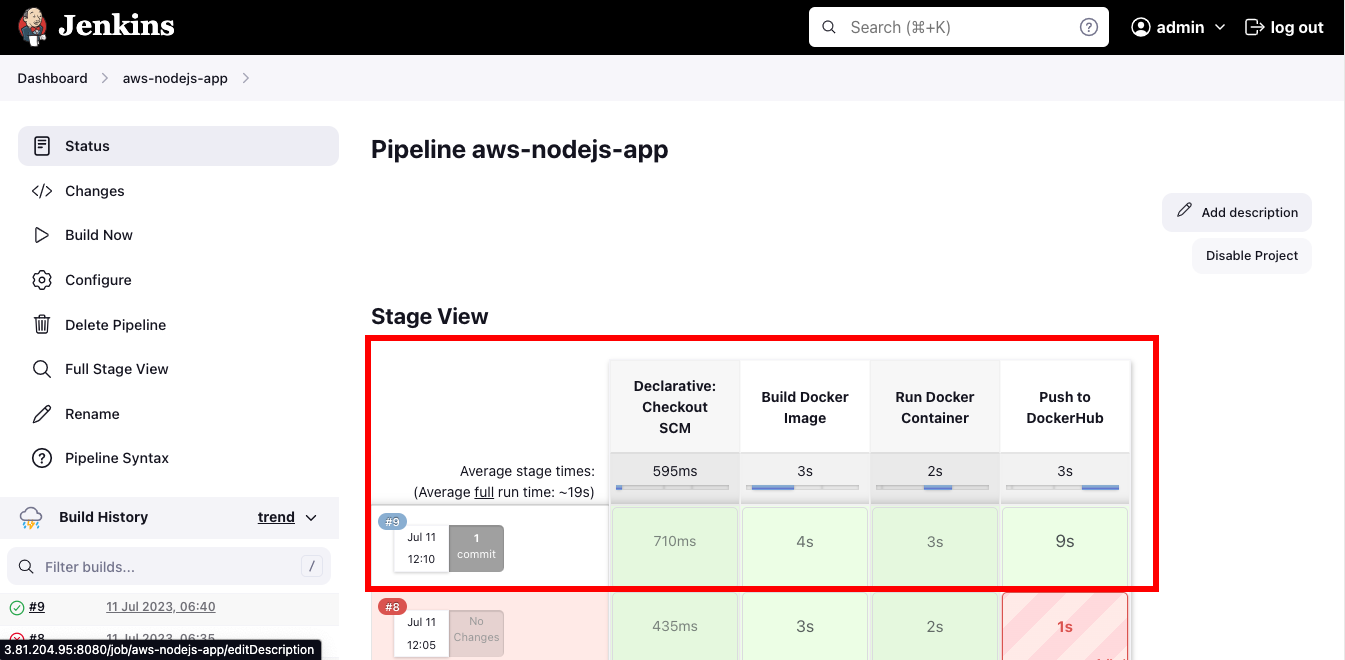
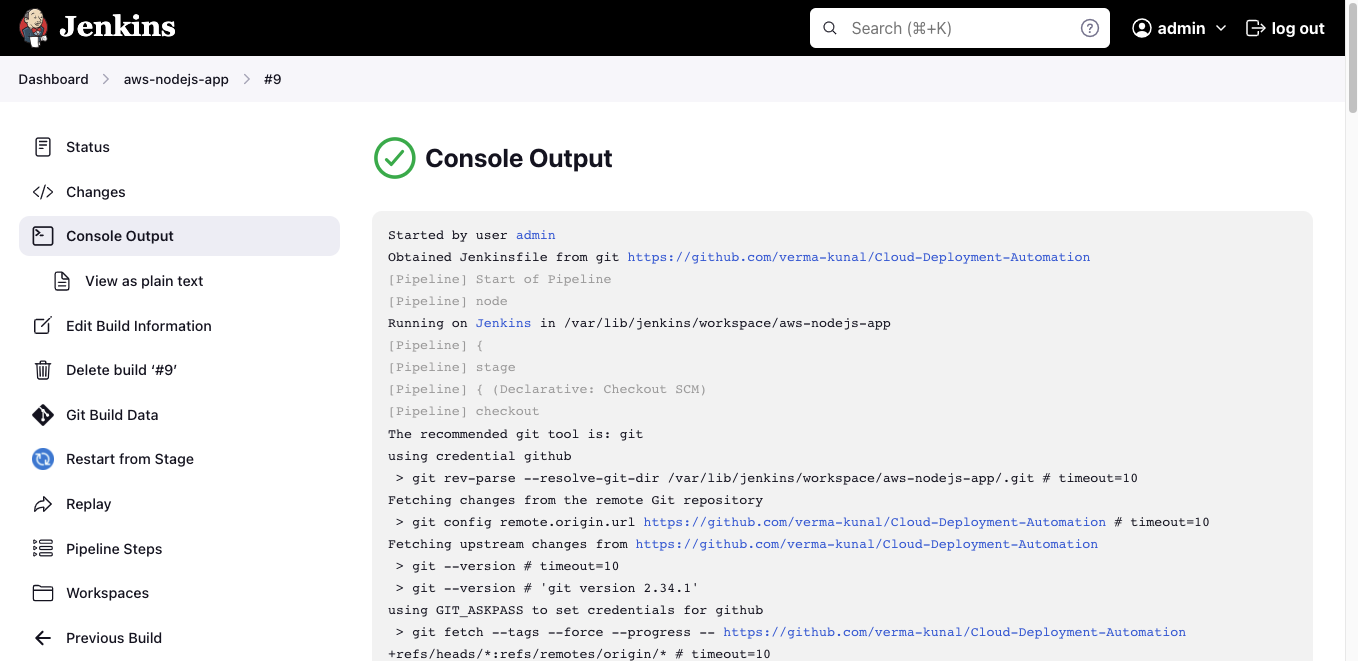
During the build process and once the build is complete, you can refer to the logs to see which operations were performed during the execution process.
Let us have a look at the results of this pipeline execution:
A new docker image will be built with the updated code from GitHub. To view the docker image, you can run the following command in the terminal window, to which your Ubuntu EC2 instance is connected:
docker imagesA new docker container will be started at port
3000. Therefore, you'll be able to access your app (with the new changes) at:http://YOUR_IP_ADDRESS:3000/Run the following command to view the running container:
docker ps
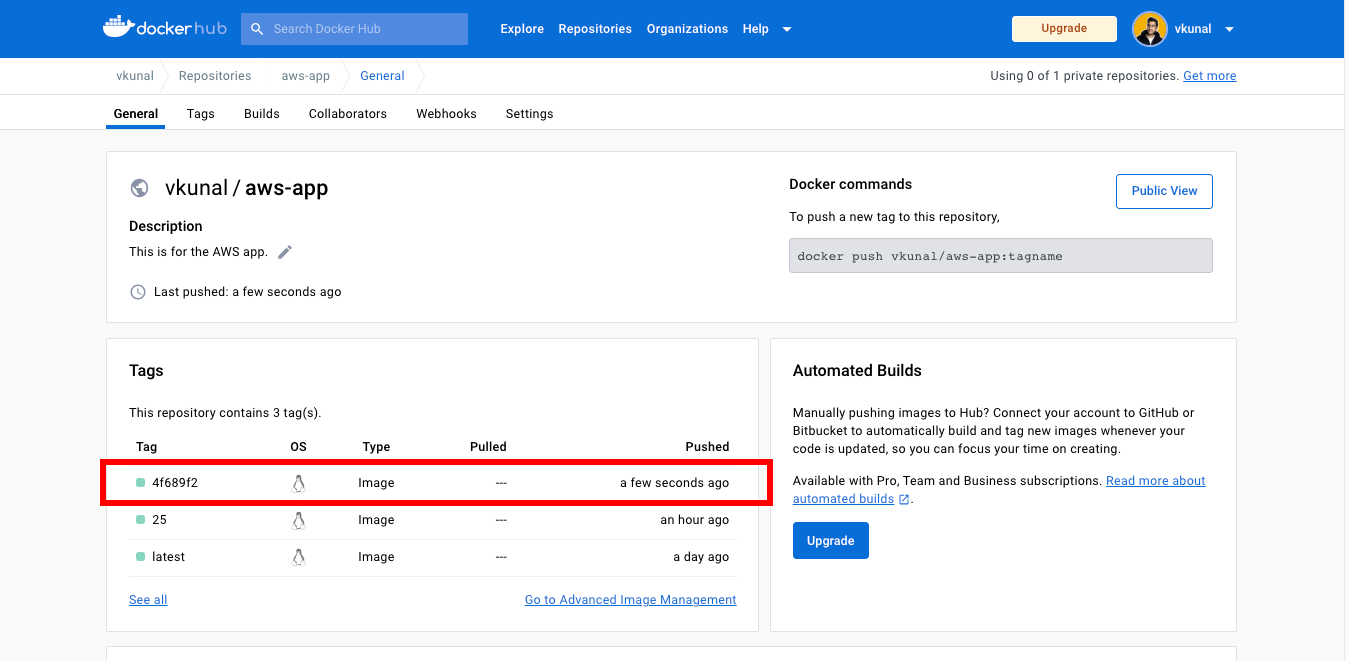
The newly created container image, tagged with the latest commit hash will be pushed to your Docker Hub repository and you can view it using the dashboard:
Summary
In this tutorial, we understood the basic concepts of automation in DevOps by building a Continuous Integration and Continuous Delivery pipeline with Jenkins CI, Docker and AWS Cloud.
We first created a new AWS IAM user and logged in to our account using the AWS Management Console. Then, we went ahead to create an Amazon EC2 instance i.e. a cloud server and remotely connected to it, using SSH.
We then took a deep dive into the installation of all the necessary tools such as Docker and Jenkins on our newly created cloud instance. Here, we took some time for the Jenkins installation and gave it the necessary permissions to run smoothly.
Further on, we spent some time authenticating GitHub and Docker Hub with Jenkins using Personal Access Token (for GitHub) and Access Token (for Docker Hub).
Moving ahead, we configured the Jenkins pipeline settings using the UI dashboard and analysed the Jenkinsfile, which defined the various stages and the overall workflow of our pipeline.
Finally, we set up a GitHub webhook trigger that listens to all the "push events" on GitHub and automatically triggers a new Jenkins build.
Resources
Here is a list of some resources that may help you follow along:
Conclusion
This CI/CD pipeline shows us a very basic implementation and the importance of automating repetitive tasks, which is one of the core principles of DevOps.
If this was your first time working with AWS, Jenkins or even Docker, Congratulations and do not forget to pat yourself on the back 👏
I hope you all had fun following along and learned new concepts.
Thank you for reading!
Connect with me
Links to all social handles!
