

If we take a peek into the ever-evolving tech landscape, "Kubernetes" with no doubt has become one of the center points for running an application in a microservice architecture. It's fair to say that since its origin at Google as "Borg", Kubernetes has become way more than just for container orchestration and management. It has grown into an open-source project that powers the infrastructure of countless organizations, from small startups to tech giants.
Whether you're a seasoned IT professional or a newcomer to the world of containerization, understanding Kubernetes is increasingly crucial in today's technology-driven world and this whole journey starts with "Understanding the K8s architecture" itself.
In this blog, we aim to demystify the complex internal architecture of Kubernetes, with the sole aim of offering you a clear and accessible entry point into the fascinating world of container orchestration and cloud-native.
A Brief about Kubernetes
Before even moving on to the main architecture, let us quickly answer the question - What is Kubernetes?
If we look at the official definition from the documentation:
Kubernetes, also known as K8s, is an open-source system for automating the deployment, scaling, and management of containerized applications.
At its core, Kubernetes is an open-source project for managing multi-containerized applications with a touch of "automation" to it.
When it comes to managing a multi-containerized environment, Kubernetes has become the solution for a lot of challenges such as:
Automated Scaling
Continuous Monitoring of services
Self Healing
Automated Scheduling
and much more!
As you move forward with understanding Kubernetes and its working in detail, you will surely have a better understanding of all these different challenges and how Kubernetes solves them.
Additionally, it's a CNCF Graduated project which means it's backed by a HUGE community of contributors, and supporters and is stable to be used in a production environment.
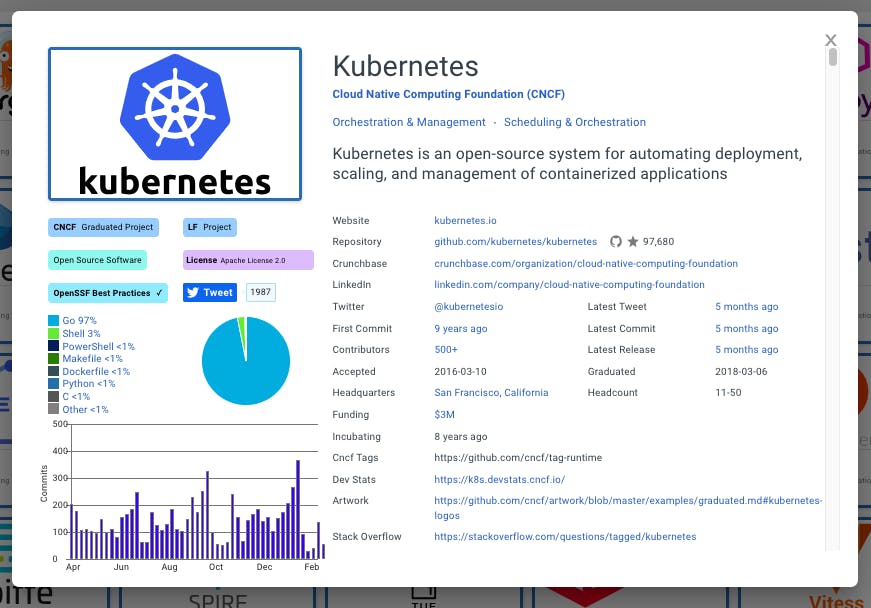
If this is your first time hearing about CNCF, check out the website to know more.
The bottom line is, although Kubernetes originally started as a way to orchestrate and manage multiple containers, due to continuous development throughout these years, it has become way more than that and you will surely see this as you go on deepening your conceptual knowledge of Kubernetes, and understanding it's complex architecture is the first step in that direction!
Pre Concept: Node and Cluster
For a moment, let us forget that we are talking about Kubernetes and its components and focus on these two terms - "Node" and "Cluster".
What is a Node?
Simply speaking, a Node is the "actual machine" or the server that does the task of running and managing a containerized application. All the components that we are going to discuss shortly are hosted inside this machine.
There are mainly two kinds of nodes you will come across:
Physical Nodes or Physical Machines - An actual computer or server
Virtual Nodes or Virtual Machines (VMs) - Software programs that emulate an actual Operating System on Cloud
Generally, in the context of Kubernetes, we interact with nodes that are Virtual Machines either running locally on your system (using software such as Virtual Box) or on cloud platforms like AWS, GCP, Digital Ocean, etc. A lot of things and concepts are involved in setting up these Nodes or VMs from scratch and an advantage of running these on a cloud is that it abstracts the need to set up and maintain these nodes and does everything for you!
To quickly summarise:
A node is the actual machine or a server that runs a containerized application.
In the context of Kubernetes, we generally interact with nodes which are virtual machines either running locally or on the cloud.
What is a Cluster?
Now that we have answered "What is a Node?", a Cluster on the other hand is a group of these servers or nodes.
A point to remember here is:
A Cluster cannot exist cannot exist without nodes. These two have a "symbiotic relationship" with each other!
In the context of Kubernetes, when we say "Oh, this is a Kubernetes Cluster", we simply mean a group of nodes that are responsible for running a containerized application, which is together known as a Cluster.
To summarise this:
A Cluster is a group of multiple nodes running together.
In the context of Kubernetes, everything runs "on top of" a cluster.
Cluster Architecture
In this particular section, we'll dive deep into all the components that make up a Kubernetes cluster and what functions are performed by each.
In further sections, we'll also take some time and discuss how a simple external request such as: kubectl run nginx --image nginx is received and processed throughout the cluster, to run an NGINX container, but that is something to be discussed later on!

As previously mentioned, a Cluster is a group of nodes. Therefore, a Kubernetes Cluster consists of mainly two kinds of nodes:
Master Node or Control Plane
Worker Nodes
Let's break each of these down and discuss the components involved, starting with the Control Plane or the Master Node.
Master Node or The Control Plane
This is the MOST IMPORTANT node or virtual machine in the entire cluster as it is responsible for making global decisions about the cluster. The tasks such as:
receiving and further processing an external request,
scheduling an application on a node,
detecting and responding to cluster events
and much more, are performed by the components that make up the Control Plane.
Let us discuss each of these components in detail!
API Server - Brain of the Cluster
It's important to understand that under the hood, Kubernetes has a RESTful API (written in Go programming language) that supports the standard HTTP operations - POST, PUT, PATCH, DELETE, GET.
In this article, we'll not go into the depths of how the Kubernetes API works but, If you wish to learn more, you may refer to the documentation.
The API server component exposes this API to enable communication between:
the end users,
different parts of the cluster, and
external components
Apart from this, the Kube API server acts as the BRAIN of the entire cluster as "every external request to the cluster is first received by the API server" and then is directed to other components.
I'll leave this explanation here as an introduction, because we'll be further discussing the main tasks performed by the API server upon receiving a request and how it communicates with other control plane components, in a later section!
ETCD - The Cluster Database
You heard it right! A Kubernetes Cluster has an internal database called etcd, which by default stores all the cluster data. Essentially, ETCD is a distributed key-value store that provides a reliable way to store data that needs to be accessed by a distributed system or cluster of machines and that's EXACTLY our use case in a Kubernetes cluster.
The keyword here is "key-value store" which means that the data is stored in the form of key-value pairs rather than the traditional way of using tables.
It's interesting to note that, ETCD is itself an open source CNCF Graduated project (just like Kubernetes). You may visit the official website to know more.
As all the cluster-related information is stored in ETCD, it can also be used to periodically take a backup of the cluster data which is certainly recommended to recover Kubernetes clusters under disaster scenarios, such as losing a control plane node itself. This is one of the MOST IMPORTANT use cases of etcd in Kubernetes and we'll be discussing this concept in detail, in a future article!
It's important to note that, "any operation in the cluster is considered as COMPLETE only after it has been written into ETCD". We'll expand on this a bit more in a later section of this blog.
Scheduler - The Node Allocator
As we discussed in the previous section, Nodes are the machines (physical or virtual) that run a containerized application. Right now, we are discussing the Master Node or the Control plane which is like an ADMIN for the cluster operations. The other kind of node in a Kubernetes cluster is called a "worker node" where the actual containerized application runs.
The main task of the Scheduler component of the control plane is "to find the best-fit worker node to run our application and then schedule the app on that".
There are a few parameters/factors involved here according to which the scheduler finds this "best-fit worker node":
resources requirements to run the app,
number of internal/external requests made by the app,
hardware/software constraints, policy constraints, and more.
A real-life use case for this can be - Node Failure. In case a node, running your containerized application fails or goes down, the scheduler is responsible for quickly ASSIGNING A NEW NODE to your application so that there is NO or LESS DOWNTIME. We'll discuss how this is done when we understand how an external request is processed throughout the cluster in a later section!
Multiple methods/concepts are involved in assigning a new node to an application. Some of them are listed below:
nodeSelector
nodeName
Node Affinity
Taints and Tolerations
You can explore and learn more about these concepts through the documentation.
Having a working knowledge of these concepts is crucial, but that is out of the scope of this article. You'll surely learn more about each of these as you go on further learning the Kubernetes concepts!
Controller Manager - Cluster State Supervisor
This is again, an IMPORTANT component to understand in the control plane because of the responsibility it has. If we look at an online definition for this:
Kubernetes controller manager is responsible for managing various controllers that regulate the state of the cluster.
To break this down a bit, a Controller is a program or a control loop that continuously watches the state of the cluster through the API server and makes necessary changes with the sole aim of "moving the current cluster state towards the desired state".
There are different types of controllers responsible for different Kubernetes objects available.
Kubernetes Objects are like building blocks or configurations that describe what should run or how resources should be managed within a Kubernetes cluster.
There are different kinds of Kubernetes objects, which enable to create and manage various aspects of a containerized application, such as:
Pods (also an important component of the architecture, discussed later!)
Deployments
Services
ReplicaSets
Persistent Volumes, etc.
Having a working knowledge of these and how to create them is essential, but that is out of the scope of this article. You'll surely learn more about each of these as you go on further learning the Kubernetes concepts.
Each of these controllers are separate process, but to reduce complexity, they are all compiled into a single binary and run in a single process through the Controller Manager component of the control plane.
Let's understand the purpose of the Controller Manager with a simple example:
Imagine that you have your containerized app running on a worker node. You want to ensure that a specific number of identical instances are always running to maintain the desired level of availability for your application. We call the "number of identical instances" replicas and even if one of the application instances fails or goes down, Kubernetes will always bring up another one to match the number of replicas we defined when creating our app.
How is this done? That's where the work of the Controller Manager comes in. A "controller" will continuously monitor the app instance's current state and will try to keep the desired number of app instances (that are defined by us) always up and running.
In summary, If anytime the current state ≠ desired state, the controller is triggered and makes the necessary changes to bring the state to what we desire or what we define!
There are mainly two kinds of controllers:
Built-in Controllers: (for each Kubernetes object)
Deployment Controller
ReplicaSet Controller
Service Controller
and more!
DIY Controllers: Yes you heard it right! You can even build YOUR controller that fits your unique use case, by extending the Kubernetes API.
This is a really interesting concept to learn and this is one of the features that makes Kubernetes "highly configurable and extensible".
To learn more about extending Kubernetes functionalities, you may refer to the documentation.
In this section, we spent a lot of time understanding controllers because that's the important part. The Controller Manager component of the control plane manages all the different controllers and these are triggered when required!
Cloud Controller Manager - The Cloud State Supervisor
This particular component of the control plane enables a Kubernetes cluster to interact and communicate with a cloud provider's API. It provides cloud-specific controllers that automate the management and provisioning of cloud resources, simplifying the deployment and operation of Kubernetes clusters on various cloud platforms like AWS, GCP, Azure etc.
You would have heard of the services such as:
These are some of the cloud provider-specific services that enable you to deploy a full-fledged Kubernetes cluster on the cloud.
In this case, the Cloud Controller Manager plays a critical role in seamlessly integrating Kubernetes with the cloud provider's services and resources, making it easier to automate processes and manage the cluster resources efficiently.
An interesting point to note here is that if you are running Kubernetes in a learning environment inside your PC (local cluster), the cluster does not have a cloud controller manager component, which certainly makes sense, right?!
Worker Node
We have mentioned this a few times in the previous section and from the name itself it's clear that this is the actual WORKING MACHINE that runs a containerized application in the cluster.
Let us discuss and understand each of its components in detail!
Pod
Let us first start with the Pod because this is important!
As we discussed previously, the Controller Manager component in the control plane manages various kinds of controllers that constantly monitor the state of the Kubernetes objects. Also, we learned that there are different kinds of Kubernetes objects, which enables us to create and manage various aspects of a containerized application.
Now, a Pod is the smallest Kubernetes object that we can run and manage in a cluster. A simple definition is given in the documentation:
A Pod (as in a pod of whales or pea pod) is a group of one or more containers, with shared storage and network resources, and a specification for how to run the containers.
Throughout the previous sections, we have talked about how Kubernetes efficiently runs and manages multi-containerized applications. The truth is, there are various challenges involved in running multiple containers especially if one or more containers are dependent on each other.
Some of the challenges include:
Network Isolation: Container network isolation is essential for managing the network rules for each container individually. Managing network isolation between containers manually can be a complex and error-prone process.
Resource Allocation: Managing the resource allocation for individual containers can be less efficient, especially if we talk about a production environment where 1000s of containers may be running at the same time.
Monitoring and Logging: In a multi-container environment, it's crucial to collect and analyze logs and metrics from all containers efficiently. Gathering, aggregating, and correlating logs and metrics from individual containers can lead to increased complexity in monitoring and troubleshooting, as we'll need to track the interactions and dependencies between each container.
To solve the above-mentioned challenges and more, containers are encapsulated within a Pod and all the containers within that pod have shared storage and network resources.
Generally, the rule of thumb is to have "one or more application containers which are relatively tightly coupled, in the same pod".
For example, imagine you have a web application that requires two containers to run properly:
Main application container - which runs your web application code
Database container - which hosts your database management system such as MySQL, PostgreSQL etc.
Let us understand how running these containers within a Pod solves the above-discussed challenges:
As these containers are within the same pod, they share the same network namespace, allowing them to communicate with each other using
localhost.The application container and the database container can also share the same storage volumes within the Pod. This enables the application to read and write data to the database using a shared storage volume.
In case you have more users and you need to scale your application, you can scale the Pod itself, which will ensure that both the application and the database containers are scaled together. This maintains the tight coupling between them.
Additionally, the controllers like Deployments or StatefulSets can manage the scaling, rolling updates, and self-healing of the entire Pod, thus, simplifying the management of both containers.
I believe we answered the question: "Why do we need a Pod in Kubernetes?" quite thoroughly and I hope you understand its need!
Now that we have understood the concept of Pods, you may replace all the instances in which we used "application containers" with "Pods" in the above sections and you'll see things have already started to fall in place!
Kubelet - Brain of the Worker Node
Yes, you heard it right! If the API Server is the brain of the entire cluster, the Kubelet component is the brain of a worker node.
Kubelet is essentially an agent which runs on each worker node and its main responsibility is to ensure that the containers described in the PodSpecs are running and healthy.
PodSpec is a file written in YAML or JSON, wherein we define our Pod - what our application should look like.
Some of the things that we define in a pod specification file are:
container images to use for the containers
ports at which the container runs
resource allocation for the pod itself
and more!
Here is an example of a pod spec file that defines a pod named
nginxwhich runs a container using thenginx:1.14.2image on port 80:apiVersion: v1 kind: Pod metadata: name: nginx spec: containers: - name: nginx image: nginx:1.14.2 ports: - containerPort: 80
Apart from ensuring the running containers are healthy, Kubelet also acts as a bridge between the worker node and the API Server of the control plane. It constantly updates the node's status to the API server and reports if any issues may occur in running the containers.
It's important to note that "Kubelet doesn't directly communicate with the pods running the containers for our application". Then, how does it ensure the containers are running and healthy?
That's where the Container Runtime component comes into the picture.
Container Runtime
Let us first revise our container basics:
A container runtime or container engine is a software component responsible for executing and managing containers. Some of the main tasks it handles:
container creation
container execution
resource isolation
communication with the underlying host OS
Some examples of popular container runtimes around the community are Docker, containerD, CRI-O etc.
Similar to its definition, the Container Runtime component is what empowers Kubernetes to run containers in the first place. It is responsible for managing the execution and the entire lifecycle of containers within the Kubernetes environment.
In the previous section, we discussed that the Kubelet runs a pod based on the PodSpec provided to it. The PodSpec usually contains the container image name to run, container ports etc. How Kubernetes should take this definition file and run the containers accordingly? - that's the job for a Container Runtime.
By default, Kubernetes supports containerD as a container runtime for a Pod.
It's interesting to know that, before the Kubernetes 1.24 release, the default container runtime supported was Docker.
What are the reasons for this shift from Docker to containerD?
This is a topic that requires separate discussion in a future article. Although, if you wish to learn more, you may refer to the K8s 1.24 release report.
Additionally, feel free to check out my recent video on Cloud Native Open Standards where I have covered the above story and a lot of essential concepts related to Kubernetes and the Cloud Native ecosystem 👇
As we discussed, the container runtime is responsible for managing the entire lifecycle of containers. There are 3 logical sub-divisions of the container runtime component, according to different aspects to manage in a container i.e. runtime, network and storage. These divisions are as follows:

CRI - Container Runtime Interface
According to the official definition:
CRI consists of specifications/requirements (work-in-progress), protobuf API, and libraries for container runtimes to integrate with kubelet on a node.
Simply speaking, CRI is a "plugin-based interface" (an API) that allows the Kubelet to use a wide variety of container runtimes available, which adheres to the CRI API formats.
For Kubelet to be able to launch the Pods with their respective containers, it certainly needs a way to communicate with the Container Runtime component, right?
Internally, the CRI defines the main gRPC protocol (Google Remote Procedure Call) for the communication between these two components.
CNI - Container Network Interface
As the name suggests, this is related to container networking. CNI is mainly concerned only with the network connectivity of containers and removing allocated resources when the container is deleted. Similar to CRI, CNI defines a set of specifications/rules and libraries for writing "plugins" to configure network connectivity in Linux containers.
These CNI plugins open the option to use a wide range of container networking solutions with a Kubernetes cluster. Some of the most widely used 3rd-party plugins include:
A detailed list of these plugins can be found in the GitHub repository.
These CNI plugins when used in a Kubernetes cluster handle tasks such as:
assigning IP addresses to pods,
setting up appropriate network policies,
managing internal/external routes for pods, etc.
There are two important rules to keep in mind upon which a CNI plugin is based:
It is required to implement the Kubernetes network model.
It must be compatible or adhere to the CNI specification.
CSI - Container Storage Interface
This will be more clear now as the concept is similar to CRI and CNI, but here we are dealing with the storage aspect of containers.
In the context of Kubernetes, CSI is like a universal translator for storage. It lets your applications speak to different storage systems without having to understand the details of each one. This means you can easily use various types of storage, like cloud storage or network-attached storage, with your Kubernetes cluster.
This provides Kubernetes with the extensibility of dynamically managing storage volumes for pods plus the flexibility to integrate various storage solutions into the Kubernetes cluster.
💡NOTE
The concepts covered above (CRI, CNI and CSI) hold a lot of importance when it comes to understanding how containers are run and managed in Kubernetes.
These along with others are collectively known as Cloud Native Open Standards.
The main aim here was to introduce these concepts and give you an idea of how these are connected.
There is certainly a lot to cover in each of them in terms of getting "proper conceptual knowledge", and that is a topic to be covered separately in a future article!
Feel free to check out my recent video where I have covered the Cloud Native Open Standards in detail.
Kube Proxy
In one of the previous sections on Controller Manager, we discussed Kubernetes Objects which enables us to create and manage various aspects of a containerized application.
When it comes to exposing an application (running as one or more Pods) in a cluster or even outside the cluster, we use a Kubernetes object called Service. We use a Service, which gets attached to a pod that makes it available on the network so that clients can interact with the actual application.
From the official Kubernetes documentation:
Each Service object defines a logical set of endpoints (usually these endpoints are Pods) along with a policy about how to make those pods accessible.
How is the "Service" K8s object able to do this? That's where the kube-proxy component comes into the picture.
Kube Proxy is responsible for maintaining the network rules on nodes. It helps route network traffic to the right places so that your applications and services (the service k8s object) can talk to each other. Imagine it as the "controller of traffic rules" within the cluster.
We can understand this concept with a simple example:
Let's say you have a web application service and a database service.
Essentially, these are two pods who wish to communicate with each other. As previously mentioned, we attach a "service object" to the set of pods to make them available on the network and open to communication.
You'll understand Kubernetes Services in more detail as you go on to learn more about Kubernetes.
Assume that:
web application service name -
webapp-servicedatabase service name -
db-service
When the web app wants to talk to the database, it will use the database service's name i.e. db-service. Here, Kube Proxy will ensure that traffic sent to the db-service is properly directed to the right database pod(s), even if those pods move or change over time.
In a nutshell, it helps services find and communicate with each other seamlessly, making the applications reliable and easy to manage.
With this, we have covered all the components that make up a Kubernetes cluster. It's the constant communication of each of these "under-the-hood" that makes Kubernetes effectively run, manage and automate multi-containerized applications.
Demo: External Request to K8s Cluster
Let us solidify our understanding of how the different components work together, by tracing the journey of an external request as it enters the Kubernetes cluster and progresses through various stages to ultimately run a containerized application.
kubectl - CLI Tool
Before we move on to making an external request, it's important to know - exactly how we make external requests to a Kubernetes cluster.
For this purpose, we use a CLI tool called kubectl. It helps us to communicate with any Kubernetes cluster's control plane (local or on the cloud) via the Kubernetes API. That simply means, internally the kubectl command uses the standard HTTP requests (POST, GET, PUT, PATCH, and DELETE) to communicate with the K8s API.
The use of kubectl here simplifies interactions with the Kubernetes cluster and abstracts away many of the complexities involved in making direct HTTP requests to the API server.
The syntax followed by the kubectl commands are as follows:
kubectl [command] [TYPE] [NAME] [flags]
where,
command: Specifies the operation that you want to perform on one or more K8s resources. For example -create,get,describe,delete.TYPE: Specifies the K8s resource type you wish to interact with. For example -pods,services,deploymentsetc.NAME: In Kubernetes, we tend to give custom names to all the resources we create. This name has to be specified with the command as well.flags: Specifies any optional flags. Usually used to override the default values, when specified in the command line.
A simple example to showcase the use of kubectl can be:
kubectl get pods
kubectl get pod my-pod
In the first command, we are requesting the API server to give the information for all the running pods (essentially containers).
In the second command, we are specifically requesting information for a pod named
my-pod.
📍 Additional Concept: Imperative v/s Declarative Way Of Resource Creation in Kubernetes
Imperative: We use the command line to directly create the resources such as pods, deployments, services etc.
For example, we can use the following command to run a pod named
nginxand specify the image to be used as"nginx":kubectl run nginx --image nginxDeclarative: Here, we use YAML manifest files to create the resources.
This is the recommended way to define complex containerized applications.For example, to run a pod named
nginxand use the container image"nginx", we'll first create a YAML manifest file that looks like the below:apiVersion: v1 kind: Pod metadata: name: nginx spec: containers: - name: nginx image: nginx ports: - containerPort: 80We'll then use the
kubectl applycommand with the-fflag (specifying the YAML file location) to create the pod with the specified configuration:kubectl apply -f nginx-pod.yamlThis is a very short introduction to the wide variety of possibilities we have either using imperative or declarative commands. It would be more justified to cover these topics in detail in a future article.
Stay tuned!
External Request: kubectl create deployment nginx-pods --image=nginx --replicas=3
Let us take a nice and solid example for this purpose.
We are using an imperative command (that means we aren't using a YAML file to define the app initially) which creates a deployment object named nginx-pods. Using the --replicas flag, we have defined 3 replicas of the pods to be created.
This means, that in the real world even if one of the instances goes down, Kubernetes will make sure that we always have 3 identical instances running of our Nginx application.
The container image to be used by all these 3 instances is defined by --image flag.
Why did we create a Deployment here?
As we know, a pod is the smallest deployable unit in Kubernetes, which represents a single instance of a running process/application. On the other hand, a deployment manages the desired state of multiple pods, making it easier to scale and update applications.
In a nutshell, we wish to create and manage multiple pods of one single application at the same time. For this purpose, we used a Deployment object instead of creating multiple pods individually!
Through this request, we'll get to know how each of the different components communicate with each other and what is exactly happening under the hood to process this request!
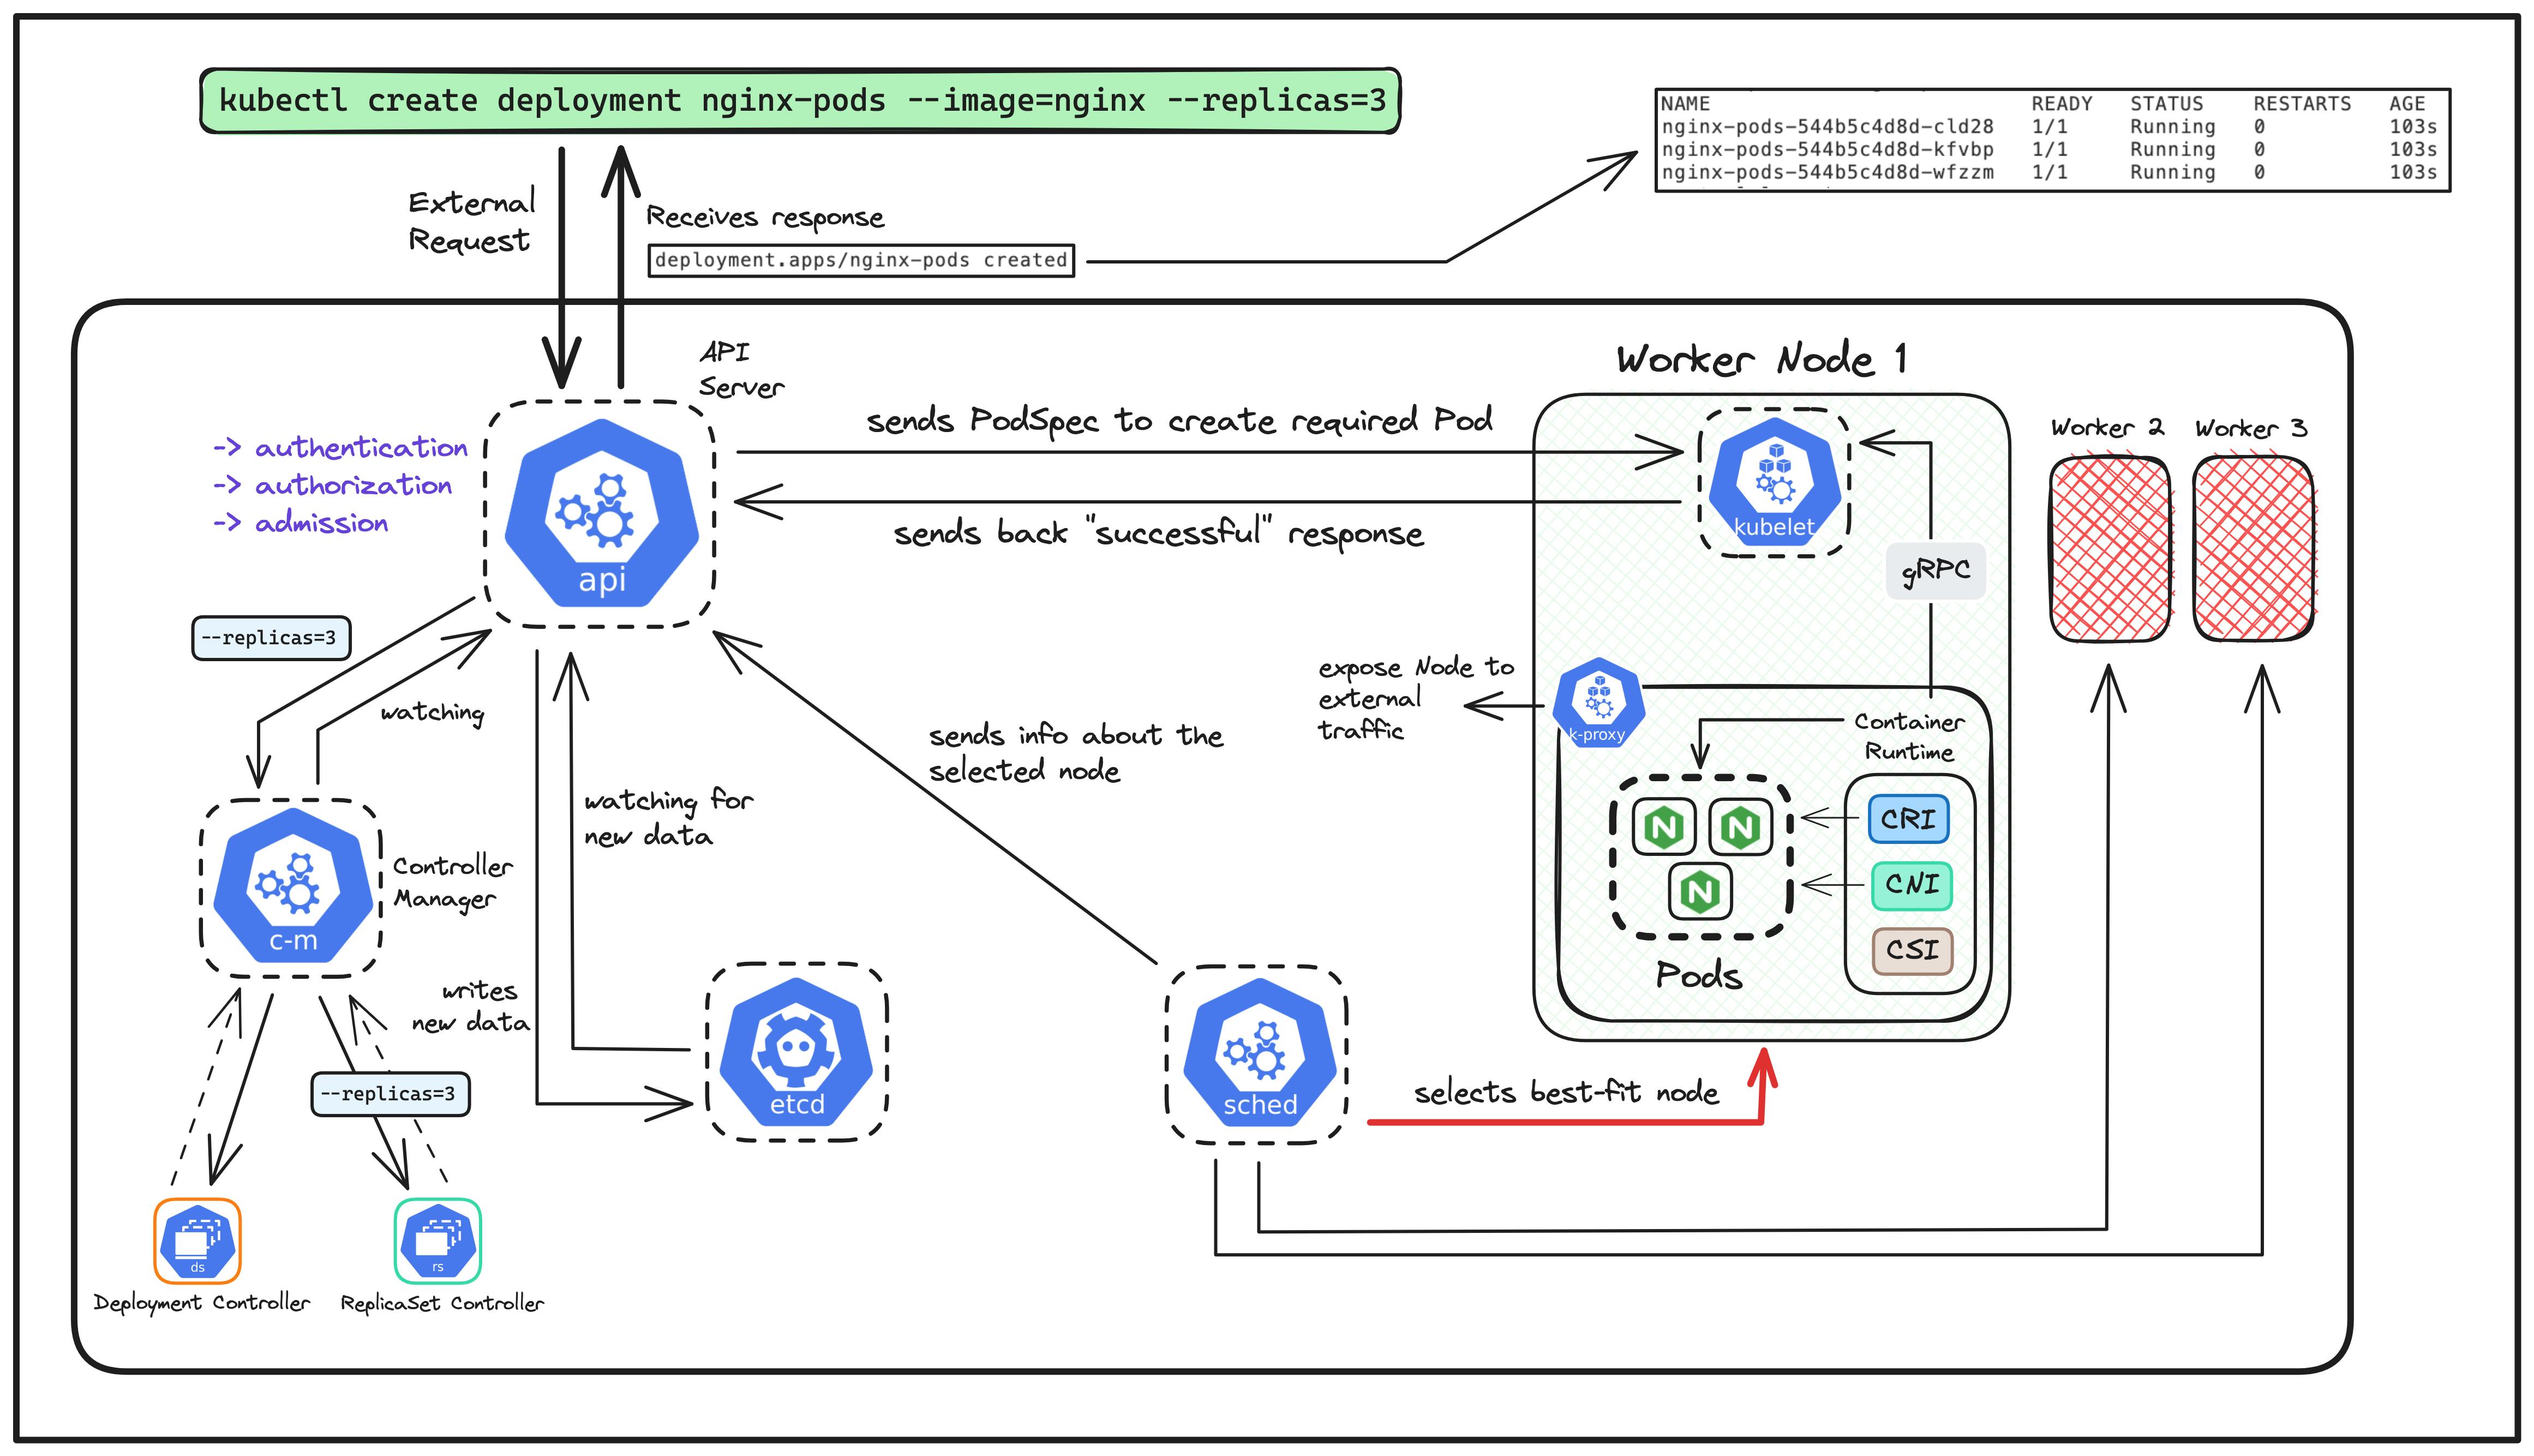
Taking reference from the diagram above, the journey starts with the user first making the request using kubectl.
Process in the Control Plane
It's important to note that, before sending the request to the API Server,
kubectltranslates the user's command into an HTTP request.So, the request would be either of these:
GET,PUT,POST,DELETEorPATCH.In our case, as we are creating a new Kubernetes resource, the request will be converted to a
POSTrequest!
Now, the API Server first receives this HTTP POST request. Here, there are mainly 3 tasks performed by the API Server upon receiving the request, which is commonly known as "The 3As of API Server":
Authentication - The API server verifies the identity of the user or service requesting to ensure it has the proper permissions for creating deployments.
Authorization - It checks whether the authenticated user or service has the necessary permissions to perform the requested action.
There are various authorization modes available in the API server:
Node Authorization
ABAC - Attribute-Based Access Control
RBAC - Role-Based Access Control
Using Webhooks
Either it chooses the mode by itself or we can explicitly define the mode to use using
--authorization-modeflag in the API Server configuration file.To know more about these modes, refer to the documentation.
Admission Control - To maintain the cluster integrity and security, the API Server applies additional policies and checks using Admission Webhooks.
An example of this can be, using a LimitRange policy while defining the application. This policy constrains the resource allocations (limits and requests) on pods and other K8s objects.
This ensures that pods cannot request excessive CPU or memory resources, preventing resource hogging and maintaining cluster stability.
Upon the completion of these checks, the API server creates a deployment object based on the user's request. This deployment defines how the "nginx" container should be deployed, including the desired number of replicas (which is 3, in this case).
Meanwhile, the other three control plane components are continuously watching the API Server for any new requests.
Let's first talk about the Controller Manager!
In our request, we have defined two things to be created which are important from the perspective of a Controller Manager i.e. deployment and replicas. Therefore, here we'll have two kinds of controllers that are always watching the status of the resources to be created:
Deployment Controller - This will simply help to manage the lifecycle of our Nginx application, allowing us to specify how many copies/replicas should be running and handling the updates smoothly for all the pods simultaneously.
Here, we specified the desired number of replicas 3 (using the
--replicasflag in the request)ReplicaSet Controller - Through the Deployment Controller, we can specify the desired number of replicas we want for our application. The ReplicaSet controller focuses on ensuring that the desired number of replicas of the pods are always running, which is 3 in our case.
The next component in line is the Scheduler!
The scheduler continuously watches the API Server for any new request. Now, as soon as the request is received by the API Server, the Scheduler will then start with the task of selecting the "best worker node" to host the 3 replicas of the Nginx pods.
We have already talked about how the Scheduler chooses this "best worker node" and what the factors involved in detail, in the Scheduler section.
You may refer to that section for more details!
In this scenario, the Scheduler chooses "Worker Node 1" to be the "best fit" and sends this as a response back to the API Server.
The third component here which is continuously watching the API Server is, the ETCD!
All the data of every operation performed till now and will be done in the future is being continuously stored in the ETCD simultaneously.
It's important to note that, "ONLY the API Server talks to the ETCD component for storing the data". Rest all the other components talk to the API Server.
Process in the Worker Node
Now that the API Server along with the other components in the control plane has processed the requests in various stages, the API Server now sends the YAML specification file for the application to the "Kubelet" component of the selected worker node (which is the Worker Node 1 in this case).
You can even view this YAML specification file (after the resources have been created) using the following command:
kubectl get deployment nginx-pods -oyaml
The output will be similar to as shown below:
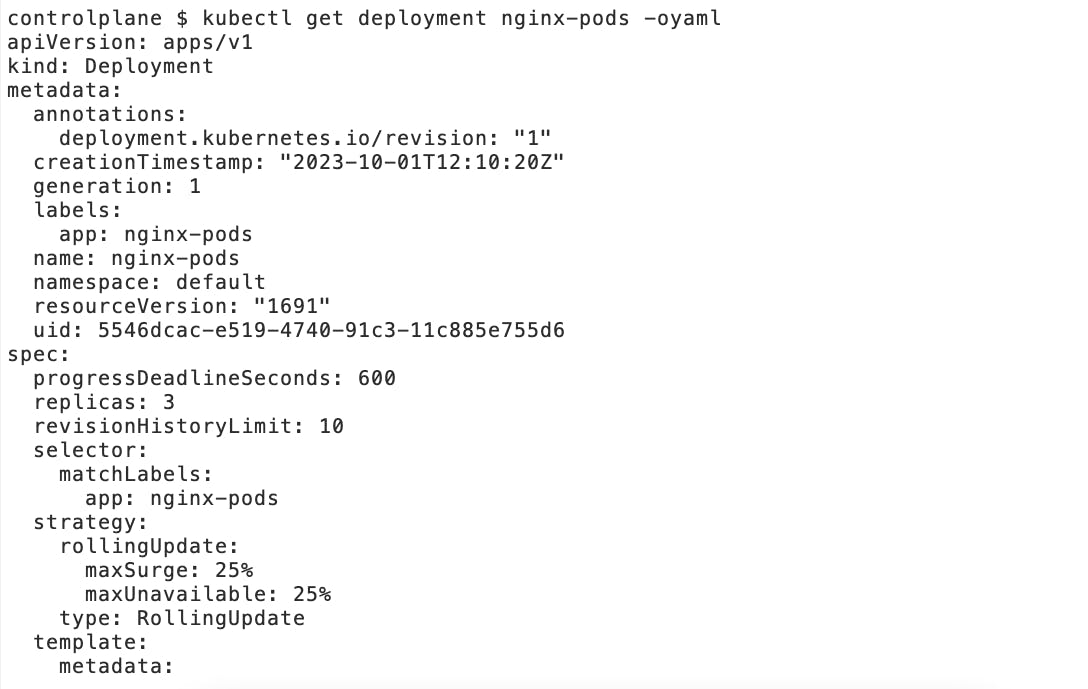
As soon as the Kubelet receives this request from the API Server, it forwards the request to the Container Runtime component which is responsible for creating and managing the entire lifecycle of the actual containers itself.
Let us take a more closer look at the Container Runtime component, through the diagram below:
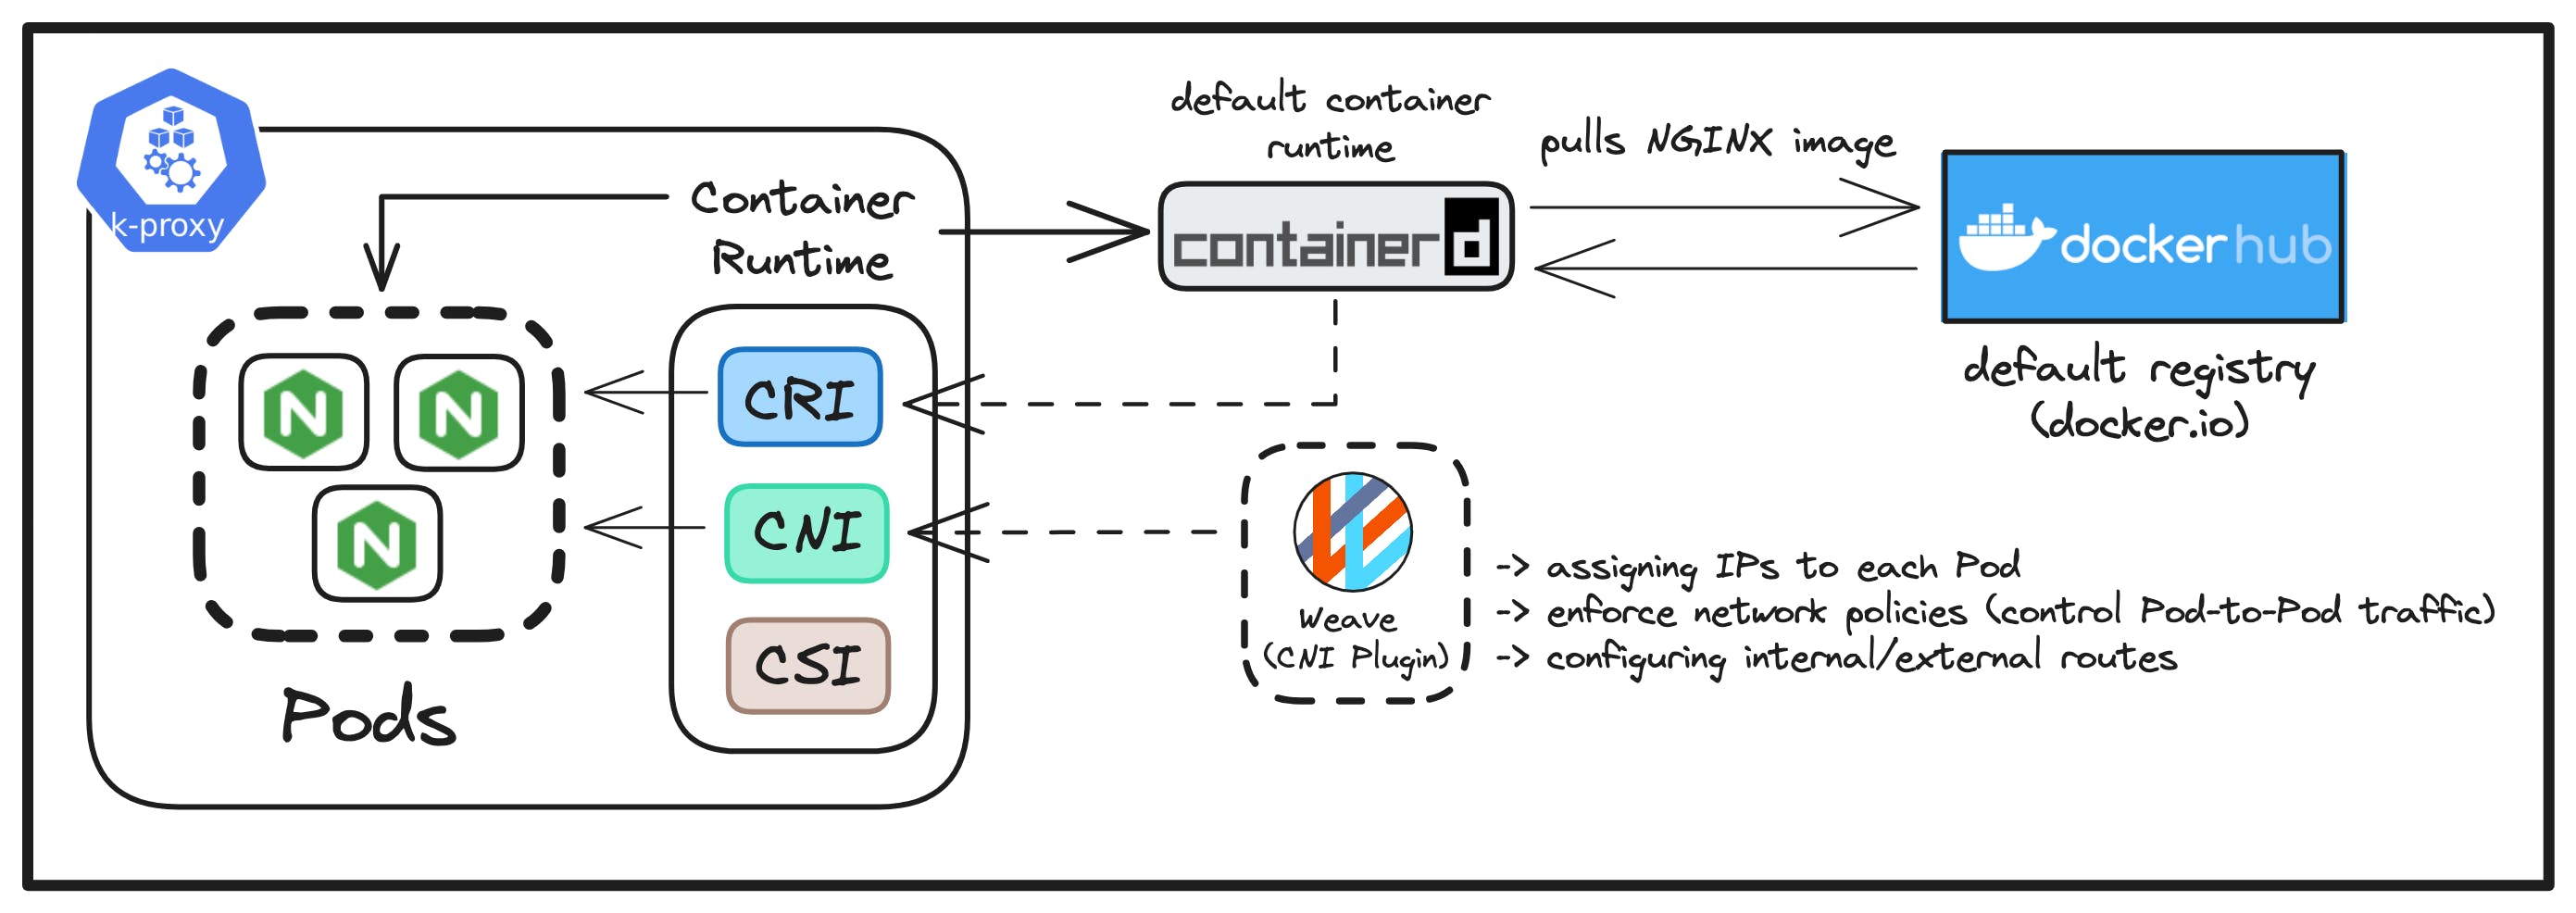
As we have previously learned, the Container Runtime has three logical sub-divisions working "under the hood" according to different aspects to manage in a container i.e. runtime, network and storage.
CRI - The default implementation of the CRI is containerD (from Kubernetes 1.24 release). Here, containerD pulls the required "nginx" image from the default container registry i.e. docker.io (Docker Hub), as defined in the YAML specification received from the Kubelet.
CNI - As for the CNI implementation, we are using the Weave Net plugin which will be responsible for setting up all the necessary networks for each of the pods to be created.
The main tasks performed by the CNI plugin are:
Assigning unique IPs to each Pod.
Enables communication between pods on different nodes in the cluster.
CSI - In this scenario, we haven't attached any specific volume to our Nginx containers, for storage purposes. Therefore, there isn't any CSI plugin configured in this case!
In a nutshell, the Container Runtime component successfully creates and runs all the Nginx pods with the help of these three sub-components 🎉
Let us understand the work of the Kube Proxy component in comparison with the CNI plugin, as both of them are responsible for setting up networking in our cluster.
Kube Proxy
In our case, we have considered that all the 3 replicas of our Nginx application are hosted together on one single worker node. But, imagine that the 3 replicas are spread across three different worker nodes i.e. each hosting one replica of the Nginx application.
Here, Kube Proxy plays an important role in managing the network configuration within each node. The main tasks performed are:
Manage network communication within each node.
Will ensure that the external traffic to the entire Nginx application on each node is correctly routed to the replicas running on that node.
Also, it will manage the load balancing of incoming requests across the three replicas, distributing traffic evenly among them on a per-node basis.
CNI Plugin
The CNI plugin's role comes into play when traffic needs to reach the Nginx pods on different nodes i.e. it manages the network configuration between nodes in a cluster (Node-to-Node).
Therefore, the main tasks performed by the CNI plugin:
It will manage the networking and routing of traffic between pods on different nodes in the cluster.
It will enforce network policies to control traffic between the Nginx pods across nodes for secure communication.
The concept of Kube Proxy and the CNI plugin can be confusing to understand at first glance. But, I hope you were able to understand the bare minimum difference between their roles.
With this, our Nginx application is finally running as pods in the worker node 🎉
The Container Runtime sends the successful response to the Kubelet. The Kubelet then communicates this successful response back to the API Server and that is when we see the following response immediately after our request has been processed:

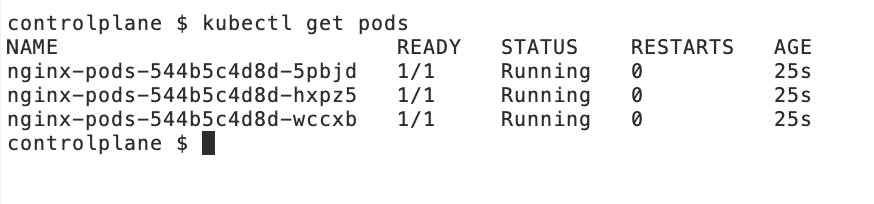
Additionally, to view the running Nginx pods, we can use the following command:
kubectl get pods
And, we'll be able to see all three replicas of our Nginx application running successfully on the Kubernetes cluster:
Conclusion
With that, we have covered the entire Kubernetes Cluster Architecture in detail. To summarise:
We first got introduced to Kubernetes and how it's changing the way we manage multi-containerized applications
We then moved forward with understanding each of the cluster components involved.
Lastly, we finish off with an understanding of how an external request to run a sample Nginx application is processed throughout the entire cluster and how each component communicates together in the entire process.
Understanding the Kubernetes architecture is the very first step into the fascinating world of container orchestration and cloud-native and I hope this article provides you with all the in-depth insights to get you started on the right path in your Cloud Native journey!
Lastly, if you are someone looking for a video version of this article - "I got you covered!" 👇
I hope you all had fun following along and learned new concepts.
Thank you for reading!
Connect with me
Links to all social handles!